Deploy Image Segmentation on NVIDIA Jetson Thor Using PyTorchExportedProgram
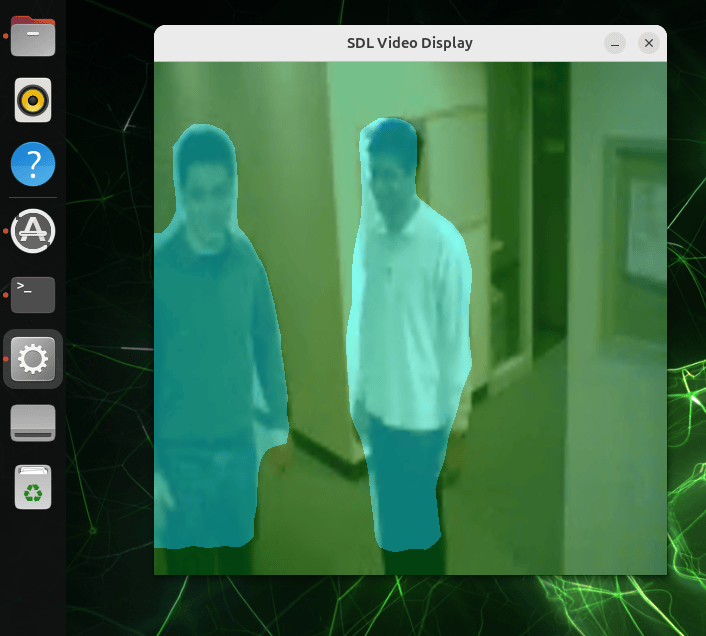
R2026bThis example shows how to deploy an image segmentation application on an NVIDIA® Jetson™ AGX Thor™ hardware board by using GPU Coder™ and the MATLAB® Coder™ Support Package for PyTorch® and LiteRT Models. The application uses a DeepLabv3+ network with a MobileNetV3-Large backbone [1] exported from PyTorch® as an ExportedProgram (.pt2). The deployed executable reads video frames, runs inference through the network, and displays the segmentation overlay on a monitor connected to the hardware board.
Prerequisites
To run this example, you must have:
An NVIDIA Jetson hardware board. To set up the hardware board, use the Hardware Setup tool.
An Ethernet crossover cable to connect the target board and development computer. If you connect the board to a local network, you do not need a cable.
A display connected to the hardware board.
The exported model file
deeplabv3plus_mobilenetv3large.pt2. To generate this file, see the Export the PyTorch Model section.
Export the PyTorch Model
Before deploying, generate the ExportedProgram file that the entry-point function loads. To download the model, install PyTorch version 2.7.1 or newer and torchvision on the host machine, and then run this Python® code. The code downloads the pretrained DeepLabv3+ MobileNetV3-Large model, exports it with a 1-by-3-by-513-by-513 input tensor that matches the expected model input, and saves the result as deeplabv3plus_mobilenetv3large.pt2.
import torch
from torchvision.models.segmentation import deeplabv3_mobilenet_v3_large, DeepLabV3_MobileNet_V3_Large_Weights

model = deeplabv3_mobilenet_v3_large(weights=DeepLabV3_MobileNet_V3_Large_Weights.DEFAULT)
model.eval()

# Export with a 1x3x513x513 input tensor matching the expected model input
example = torch.randn(1, 3, 513, 513, dtype=torch.float32)
ep = torch.export.export(model, (example,))
torch.export.save(ep, "deeplabv3plus_mobilenetv3large.pt2")
Connect to the Jetson and Verify GPU Environment
Create a live hardware connection to the Jetson board by creating a jetson object. Use the coder.checkGpuInstall (GPU Coder) function to verify the GPU code generation environment on the Jetson board.
hwObj = jetson;
### Checking for CUDA availability on the target...
### Checking for 'nvcc' in the target system path...
### Checking for cuDNN library availability on the target...
### Checking for TensorRT library availability on the target...
### Checking for prerequisite libraries is complete.
### Gathering hardware details...
### Checking for third-party library availability on the target...
### Checking for available I2C buses...
### Gathering hardware details is complete.
Board name              : NVIDIA Jetson AGX Thor Developer Kit
CUDA Version            : 13.0
cuDNN Version           : 9.1
TensorRT Version        : 10.13.3
GStreamer Version       : 1.24.2
V4L2 Version            : 1.26.1
SDL Version             : 1.2
OpenCV Version          : 4.8.0
Available Webcams       : Logitech Webcam C930e
Available GPUs          : NVIDIA Thor
Available Digital Pins  :
envCfg = coder.gpuEnvConfig("jetson");
envCfg.BasicCodegen = 1;
envCfg.Quiet = 1;
envCfg.HardwareObject = hwObj;
coder.checkGpuInstall(envCfg);
Examine the Entry-Point Function
The entry-point function mEntryPoint uses the loadPyTorchExportedProgram function to load the PyTorch ExportedProgram into MATLAB. The function then passes the network to segmentVideo, which runs the segmentation pipeline. Examine the entry-point function.
type mEntryPoint.mfunction mEntryPoint()
%#codegen
% Copyright 2025-2026 The MathWorks, Inc.
deeplabv3plus_mobilenetv3 = loadPyTorchExportedProgram("deeplabv3plus_mobilenetv3large.pt2");
segmentVideo(deeplabv3plus_mobilenetv3);
end
The segmentVideo function reads frames from the video file vipmen.avi located on the target. Before you run the generated application, copy the vipmen.avi file from the current folder to the target. The segmentVideo function processes each frame of the video through the network, and displays the segmentation overlay. For each frame, the function performs these steps:
Preprocessing — Resize the frame to the 513-by-513 input size that the model requires and normalize it by using ImageNet statistics. The
readFramefunction reads the image in the HWCN layout, where H is height, W is width, C is the number of channels, and N is the number of observations. To use the image with the network, permute the image from the HWCN layout to the NCHW layout.Inference — Run forward inference on the preprocessed frame by using the
invokefunction. The output contains per-pixel class scores for 21 semantic classes.Postprocessing — Permute the output back to HWCN layout, and select the class with the highest score at each pixel. A colormap assigns a unique color to each class, and the
labeloverlayHelperfunction overlays the segmentation on the original image.Display — On the Jetson, render the segmentation overlay directly on the connected display by using the
imageDisplayobject. Displaying the output on the hardware board provides real-time visualization without streaming frames back to the host.
type segmentVideo.mfunction segmentVideo(net)
%#codegen
% Copyright 2026 The MathWorks, Inc.
hwobj = jetson;
vidLocation = '/home/ubuntu/Videos/vipmen.avi';
videoReadObj = VideoReader(hwobj,vidLocation,'Width',160,'Height',120);
dispObj = imageDisplay(hwobj);
% ImageNet normalization stats
imgMean = reshape(single([0.485, 0.456, 0.406]), [1 1 3]);
imgStd = reshape(single([0.229, 0.224, 0.225]), [1 1 3]);
% Colormap for 21 classes
num_classes = 21;
palette_base_vals = [2^25 - 1, 2^15 - 1, 2^21 - 1];
class_indices = coder.const((1:num_classes)');
colors_raw = coder.const(double(class_indices) * palette_base_vals);
colors_normalized = coder.const(double(uint8(mod(colors_raw, 255))) / 255.0);
while videoReadObj.hasFrame
frame = videoReadObj.readFrame();
img_resized = imresize(frame, [513, 513]);
img_normalized = (im2single(img_resized) - imgMean) ./ imgStd;
% HWC -> NCHW for PyTorch
img_nchw = permute(img_normalized, [4 3 1 2]);
out = invoke(net, img_nchw);
% NCHW -> HWC
out = permute(out, [3 4 2 1]);
% Per-pixel class with highest score
[~, classIdx] = max(out, [], 3);
if coder.target('MATLAB')
segmented_image = labeloverlay(img_resized, classIdx, 'Colormap', colors_normalized);
else
segmented_image = labeloverlayHelper(img_resized, classIdx, 'Colormap', colors_normalized);
end
% Transpose for Jetson display layout
segmented_image_t = cat(3, segmented_image(:,:,1)', ...
segmented_image(:,:,2)', segmented_image(:,:,3)');
image(dispObj, segmented_image_t);
end
end
Generate CUDA Code
To generate CUDA® code to deploy to the hardware board, create a GPU code configuration object for the executable build type.
cfg = coder.gpuConfig("exe");Create a hardware configuration object that targets the Jetson platform.
cfg.Hardware = coder.hardware("NVIDIA Jetson");
cfg.Hardware.BuildDir = "~/remoteBuildDirOGVid";
cfg.GenerateExampleMain = "GenerateCodeAndCompile";
The codegen command generates CUDA code on the host, transfers it to the Jetson, and builds the executable remotely. GPU Coder embeds the network weights from the .pt2 file into the generated code as binary constants.
codegen -config cfg mEntryPoint -report
### Checking for CUDA availability on the target...
### Checking for 'nvcc' in the target system path...
Code generation successful: View report
Deploy the Application on Jetson Thor
Copy the video file vipmen.avi from the current folder to the Jetson workspace.
putFile(hwObj, "vipmen.avi", "/home/ubuntu/Videos/");
Run the application. The application opens a Simple DirectMedia Layer (SDL) window on the Jetson display. The SDL window shows the segmentation overlay on each video frame.
pid = runApplication(hwObj, "mEntryPoint");### Launching the executable on the target... Executable launched successfully with process ID 3634049. Displaying the simple runtime log for the executable... Note: For the complete log, run the following command in the MATLAB command window: system(hwobj,'cat /home/ubuntu/remoteBuildDirOGVid/MATLAB_ws/R2026b/home/user/Documents/MATLAB/ExampleManager/user.Bdoc.j3341106.freshExample/coder_ai-ex43278067/mEntryPoint.log')
To stop the application, use the killApplication function.
killApplication(hwObj, "mEntryPoint");References
[1] Chen, Liang-Chieh, Yukun Zhu, George Papandreou, Florian Schroff, and Hartwig Adam. “Encoder-Decoder with Atrous Separable Convolution for Semantic Image Segmentation.” In Computer Vision – ECCV 2018, edited by Vittorio Ferrari, Martial Hebert, Cristian Sminchisescu, and Yair Weiss. Springer International Publishing, 2018. https://doi.org/10.1007/978-3-030-01234-2_49.

