Configure Checkers for Polyspace as You Code at the Command Line
If you use an IDE that is not supported by Polyspace® as You Code, you can check for defects and coding rule violations by using Polyspace as You Code at the command line. The default analysis checks for the default set of Polyspace Bug Finder™ defects. See Polyspace Bug Finder Defects Checkers Enabled by Default (Polyspace Bug Finder). To check for other defects and coding rule violations, configure Polyspace as You Code.
To configure checkers, create a checkers file and then specify the checkers file at the command line. For equivalent workflows in the Polyspace desktop and server, see Prepare Checkers Configuration for Polyspace Bug Finder Analysis (Polyspace Bug Finder).
Configure Checkers and Coding Rules Directly at the Command Line
You can specify a selection of checkers and coding rules by using analysis options with appropriate values directly at the command line. For a list of analysis options related to checkers, see Coding Standards and Code Metrics (Polyspace Bug Finder) and Bug Finder Analysis (Polyspace Bug Finder).
For instance, to activate the performance checkers and MISRA™ C:2023 coding rule, use this command at the command line.
polyspace-bug-finder-access -sources sourceFile -checkers performance -misra-c-2023 all
sourceFile is the source file you want to analyze. For the command
line syntax of each option, see Complete List of Polyspace Bug Finder Analysis Engine Options (Polyspace Bug Finder). To view the results, use polyspace-results-export (Polyspace Bug Finder).You can specify the checkers and coding rule options in an options file and reuse the options
file in different analysis. An options file is a text file with one analysis option for each
line. For example, to run the preceding analysis, create an options file
CheckersOptions.txt that contains these
options:
-checkers performance
-misra-c-2023 all
polyspace-bug-finder-access -options-file CheckersOptions.txtSpecifying checkers and coding rule selection enables you to select predefined subsets of checkers and coding rules. To select a customized subset of checkers and coding rules, configure checkers by using a checkers activation file.
Use Existing Checkers Activation File
You can use a checkers activation file (XML) or a
user-defined coding standard (.pschk) to configure checkers. A checkers
activation file activates a set of Bug Finder defects and external coding rules. A user-defined
coding standards allow you to collect coding rules that are relevant specifically to your
project into a single standard when an existing coding standard does not exactly meet your
needs. If you have one of these artifacts, specify the file as an input the option
-checkers-activation-file.
At the Linux® command line, enter:
polyspace-bug-finder-access -sources sourceFile \-checkers-activation-filePathToCreatedCheckerFile
polyspace-bug-finder-access -sources sourceFile ^-checkers-activation-filePathToCreatedCheckerFile
PathToCreatedCheckerFile.pschk)
file.Optionally, you can modify the selection of checkers in these files. Open the Checkers Selection window by using this command at the command line:
polyspace-checkers-selection
Import Checkers Configuration from Project
If you have a Polyspace desktop project file (.psprj), you can import the checkers
configuration from it. At the command line, enter:
ps-migrate-checkers-selection -import-options-from-psprj PathToProjectThe command
ps-migrate-checkers-selectionis located in the folderpolyspaceroot\polyspace\bin\archpolyspacerootarchwin64,glnxa64, ormaci64.PathToProject.psprjis the full path to the Polyspace desktop project.
After you run the command, Polyspace creates a checkers activation file using the imported checkers configuration. The
checkers activation file is stored in a subfolder named import in the same
location as the .psprj file. Use the checkers activation file as an input to
-checkers-activation-file when running Polyspace as You Code at the command
line.
Alternatively, you can import the .psprj project file as a
.psprjx project file by opening the .psprj file in the
Polyspace Platform user interface. Polyspace creates a checkers activation file using the checkers configuration of the
.psprj file. To get the path to your checkers activation file, go to
Configuration and select the Static Analysis tab. The
path is under Defects and Coding Standards > Checkers activation file. Specify the path to the checkers activation file as an input to
-checkers-activation-file when running Polyspace as You Code at the command
line.
For more details, see Generate Build Options for Polyspace as You Code Analysis at the Command Line.
Create Checkers Configuration
If you do not have a checkers activation file (XML), you can create it by
using the Checkers Selection window. Creating user-defined coding standards
(.pschk) from the Checkers Selection window is not supported. For details
about how you can create your own user-defined coding standard, see Create User-Defined Coding Standard by Using Polyspace Bug Finder Checkers (Polyspace Bug Finder).
To open the Checkers Selection window, at the command line, enter:
polyspace-checkers-selection
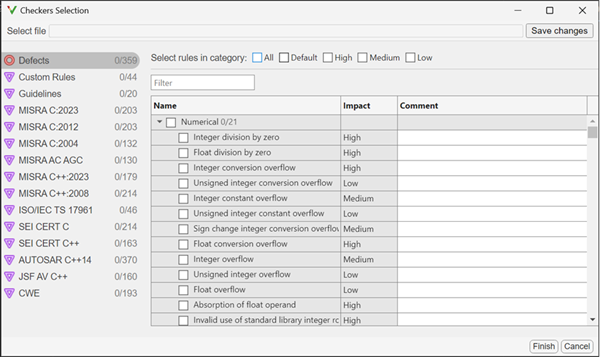
In the Checkers Selection window, select the checkers that you want to activate. You can also activate predefined categories of defect checkers such as All, Default, High, Medium, and Low. See Classification of Defects by Impact (Polyspace Bug Finder). Similarly, you can activate predefined sets of coding rules that are defined by their standards.
When selecting Guidelines > Software Complexity checkers, review their thresholds. If the default thresholds are not acceptable, specify a suitable threshold in the Threshold column. See
Check guidelines
           (-guidelines)
(Polyspace Bug Finder).When selecting Custom Rules, review the Pattern and Convention for the rules. See
Check custom rules
          (-custom-rules)
(Polyspace Bug Finder).To classify Bug Finder defects or coding rule checkers using your own classification tag , enter text in the Comment column of the Checkers selection window. Polyspace displays that text in the Results Details pane and in the Detail column of the Results List (if available) when you review results in the desktop interface, in Polyspace Access™, or in the Polyspace as You Code plugins.
Note
The custom text that you enter in the Checkers selection window is omitted in:
Generated reports.
The Polyspace desktop interface when you open results from Polyspace Access. This limitation applies only to Bug Finder checkers.
Save the selection as a reusable checkers activation file by clicking Save changes. Click Finish to close the window.
You can later reuse the checkers activation file as an input in to the option
-checkers-activation-file.
Modify Checkers Behavior
To modify the default behavior of Bug Finder defect checkers and coding rules, use analysis options. For a list of analysis options that modify the default checker behavior, see Modify Default Behavior of Bug Finder Checkers (Polyspace Bug Finder).
To specify analysis options in Polyspace as You Code:
Use the options in the command line. For instance, to modify the trust boundary of your analysis, at the Linux command line, enter:
At the Windows command line, enter:polyspace-bug-finder-access -sources sourceFile
-checkers-activation-fileCreatedCheckerFileHere,polyspace-bug-finder-access -sources sourceFile
-checkers-activation-fileCreatedCheckerFileCreatedCheckerFileis the XML checkers activation file andsourceFileis the full path to the source file that you analyze. You can specify multiple behavior modifying options in a single command.Append the analysis options in the options file. An options file is a text file with one analysis option for each line. For instance, to add the analysis options
-code-behavior-specifications(Polyspace Bug Finder) andEffective boolean types (-boolean-types)(Polyspace Bug Finder), in the options file, append these lines:where-code-behavior-specifications file1 -boolean-types boolean1_t,boolean2_t
file1is the path to a code behavior specification (.XML) file andboolean1_t,boolean2_tare boolean types.If you do not have an existing options file, create an options file containing the necessary options. See Options Files for Polyspace Analysis (Polyspace Bug Finder).
See Also
Topics
- Polyspace Bug Finder Defects Checkers Enabled by Default (Polyspace Bug Finder)
- Options Files for Polyspace Analysis (Polyspace Bug Finder)
- Checkers Deactivated in Polyspace as You Code Analysis
- Modify Default Behavior of Bug Finder Checkers (Polyspace Bug Finder)
- Run Polyspace as You Code from Command Line and Export Results