Database Explorer
Configure, explore, and import database data
Description
The Database Explorer app lets you quickly connect to a database, explore the database data, and import data into the MATLAB® workspace in a visual way. If you have minimal proficiency writing SQL queries or want to browse the data in your database quickly, use this app to interact with your database.
Using the Database Explorer app, you can:
Create and configure ODBC and JDBC data sources.
Establish multiple connections to the same or different databases.
Select tables and columns of interest.
Fine-tune selections using SQL query criteria.
Preview selected data.
Customize import options.
Import selected data into the MATLAB workspace for analysis.
Save generated SQL queries.
Generate MATLAB code.
To watch an introductory video, see Using the Database Explorer App.
Open the Database Explorer App
MATLAB Toolstrip: On the Apps tab, click the Show more arrow to open the apps gallery. Then, under Database Connectivity and Reporting, click Database Explorer.
MATLAB command prompt: Enter
databaseExplorer.
Examples
Connect to a Microsoft Access® database using the Database Explorer app. Then, select columns from a single table and preview the data. The app previews query results by default.
Set up the data source for the
tutorial.accdb database and name it dbdemo. For
details, see Microsoft Access ODBC for Windows.
In the Connections section of the Database Explorer tab, click Connect and select the data source for the connection. The connection dialog box opens. Leave the user name and password blank, and click Connect.
Note
For other databases, the Catalog and Schema dialog box opens. Select the name of the catalog and schema from the Catalog and Schema lists, as appropriate for your database.
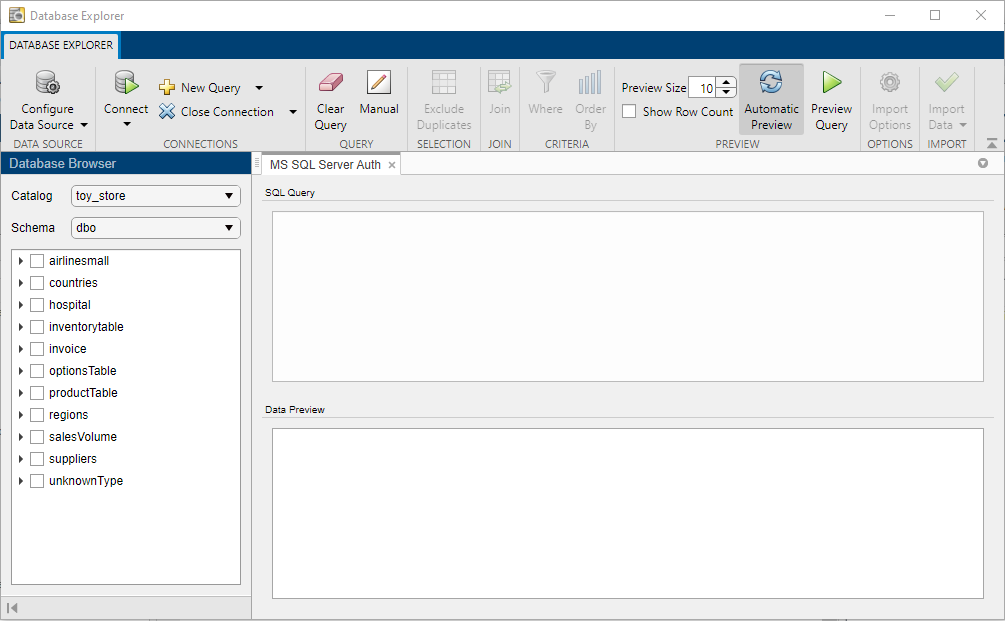
The Database Explorer app creates a connection to the Microsoft Access database. The Database Browser pane displays the available tables in the database.

The data source tab, which is named dbdemo, appears to the right of the Database Browser pane. The data source tab contains two empty panes, SQL Query and Data Preview.

For any table, you can select the table information in these ways:
To select tables, click the database table name in the Database Browser pane. The Database Explorer app updates the SQL Query pane with an SQL query that selects all columns and rows from the chosen table. Simultaneously, the Database Explorer app updates the Data Preview pane with a preview of the query results. The first 10 rows of data appear in the Data Preview pane by default.
To select individual columns from a selected table, expand the table name node in the Database Browser tree view. Select specific check boxes to choose individual table columns and display them in the Data Preview pane. The SQL query adjusts to each selection automatically.
Note
The order of the columns in the Data Preview pane matches the order in which you select them in the Database Browser pane.
Select the table name inventorytable.
To change the data you see, select or clear check boxes in the Database Browser pane. The app updates the SQL query in the SQL Query pane. The app updates the data in the Data Preview pane.
The Data Preview pane displays 10 rows. The total
number of rows selected in the database appears, within parentheses, next to
the name of the pane, Data Preview. Change the number
of rows by selecting or entering a value in the Preview
Size box in the Preview section of the
Database Explorer tab. Select the value
20. The number of rows adjusts in the Data
Preview pane.
Note
The value in the Preview Size box controls the maximum number of rows displayed in the Data Preview pane. If this value is larger than the total number of rows in the query results, then the total number of rows is displayed, within parentheses, next to the name of the pane, Data Preview.

You can sort the rows of data by a specific column. In the Criteria section, click Order By. The Order By tab is displayed in the toolstrip.
In the Add section, in the
Column list, select the column
price. In the Add
section, click Add Sort. The Database Explorer app
sorts the data in ascending order in the Data Preview
pane. To change the order, click Descending in the
Edit section.

Note
To add more sorts, select another column from the Column list and click Add Sort. You can change the position of the sort in the SQL query by clicking it in the list in the Edit section, and then clicking Move Up or Move Down.
In the Close section, click Close Order By to close the Order By tab.
In the Connections section, close the database connection by clicking Close Connection.
Note
If multiple connections are open, close the database connection of your choice by selecting the corresponding data source from the Close Connection list.
Connect to a Microsoft Access database using the Database Explorer app. Then, join data in multiple tables by selecting columns in the tables. The app previews query results by default. After previewing the data, import all query results into the MATLAB Workspace and perform simple data analysis.
Set up the data source for the
tutorial.accdb database and name it dbdemo. For
details, see Microsoft Access ODBC for Windows.
In the Connections section of the Database Explorer tab, click Connect and select the data source for the connection. The connection dialog box opens. Leave the user name and password blank, and click Connect.
The Database Explorer app creates a connection to the Microsoft Access database. The Database Browser pane displays the available tables in the database.
The data source tab, which is named dbdemo, appears to the right of the Database Browser pane. The data source tab contains two empty panes, SQL Query and Data Preview.
In the Database Browser pane, select the inventorytable table as the first table for the join. The Database Explorer app updates the SQL Query pane with an SQL query that selects all columns and rows from the inventorytable table. Simultaneously, the app updates the Data Preview pane with a preview of the query results. The first 10 rows of data appear in the pane by default.

In the Join section, click Join to display the Join tab in the toolstrip. In the Add section, the name of the table selected in the Database Browser pane appears in the left Table list. For details about joining tables, see Join Tables Using Database Explorer App.
In the left Column list, select the name of the
shared column productnumber.

In the right Table list, select the table
producttable as the table to join. Select the
name of the shared column productnumber in this
table in the right Column list.

In the Add section, click Add Join. The Join Diagram pane displays a pictorial representation of the join between the selected tables. The SQL Query pane updates the SQL query with the new join. The Data Preview pane reflects the results of the updated SQL query.
The Database Explorer app selects the inner join by default.
Note
Some databases do not support all join types.

In the Close section, click Close Join to close the Join tab.
In the tree view of the Database Browser pane, select productdescription under producttable. The SQL Query and Data Preview panes update with the selected table column.
Add filter criteria to the SQL query. In the Criteria section, click Where to display the Where tab in the toolstrip.
Filter the SQL query results for prices greater than $10. In the
Add section, in the Column
list, select inventorytable.price. Select the
> operator for the filter in the
Operator list. Enter 10 in the
Value list. Click Add
Filter.
Note
If you enter filters using the LIKE or NOT LIKE operators, then enter the value in single quotes to represent a string.

The SQL Query and Data Preview
panes display the updated query results based on the new filter with the
WHERE condition.

In the Close section, click Close Where to close the Where tab.
Import all SQL query results into the
MATLAB Workspace. In the Import section, click ![]() . In the Import Data dialog box, enter the name
. In the Import Data dialog box, enter the name
data for the MATLAB Workspace variable, and click OK. The MATLAB Workspace displays the table data.
Display the SQL query results at the command line.
data
data =

  6×5 table

    productnumber    quantity    price        inventorydate        productdescription
    _____________    ________    _____    _____________________    __________________

     1               1700        14.5     '2014-09-23 09:38:34'    'Building Blocks'
     3                356          17     '2014-05-14 07:14:28'    'Slinky'
     4               2580          21     '2013-06-08 14:24:33'    'Space Cruiser'

    ...
Find the maximum product price.
max(data.price)
ans =

    24
In the Connections section, close the database connection by clicking Close Connection.
Note
If multiple connections are open, close the database connection of your choice by selecting the corresponding data source from the Close Connection list.
Connect to a Microsoft Access database using the Database Explorer app. Then, create an SQL query that joins two tables using a left join. The Database Explorer app previews query results by default. After previewing the data, import all query results into the MATLAB workspace and perform simple data analysis.
Set up the data source for the
tutorial.accdb database and name it dbdemo. For
details, see Microsoft Access ODBC for Windows.
In the Connections section of the Database Explorer tab, from the Connect list, select the data source for connection. The connection dialog box opens. Leave the user name and password blank, and click Connect.
The Database Explorer app creates a connection to the Microsoft Access database. The Database Browser pane displays the available tables in the database. The data source tab, which is named dbdemo, appears to the right of the Database Browser pane. The data source tab contains two empty panes, SQL Query and Data Preview.
In the Database Browser pane, select the suppliers table as the first table for the join.
The Database Explorer app updates the SQL Query pane with an SQL query that selects all columns and rows from the suppliers table. Simultaneously, the Database Explorer app updates the Data Preview pane with a preview of the query results. The first 10 rows of data appear in the pane by default.
In the Join section, click Join to display the Join tab in the toolstrip. In the Add section, the name of the table selected in the Database Browser pane appears in the left Table list. For details about joining tables, see Join Tables Using Database Explorer App.
In the left Column list, select the name of the
shared column suppliernumber. In the right
Table list, select the name
producttable as the table to join. Select the
name of the shared column suppliernumber in this
table in the right Column list.
In the Add section, click Add Join. The Database Explorer app creates an inner join by default. In the Edit section, click Left to change the join from an inner join to a left join. The Join Diagram pane displays a pictorial representation of the join between the selected tables. The SQL Query pane updates the SQL query with the new join. The Data Preview pane reflects the results of the updated SQL query.
In the Close section, click Close Join to close the Join tab.
Increase the number of rows displayed in the Data
Preview pane. In the Preview section,
enter 20 in the Preview Size
box.
In the tree view of the Database Browser pane, select unitcost under producttable. The Data Preview pane updates with a new column.

The NaN value in the unitcost
column indicates that the corresponding supplier does not supply
products.

Add filter criteria to the SQL query. In the Criteria section, click Where to display the Where tab in the toolstrip.
Filter the SQL query results for products with a unit cost greater than
$10. In the Add section, in the
Column list, select the column name
producttable.unitcost. Select the
> operator for the filter in the
Operator list. Enter 10 in the
Value list. Click Add
Filter.
Note
If you enter filters using the LIKE or NOT LIKE operators, then enter the value in single quotes to represent a string.
The SQL Query and Data Preview
panes display the updated query results based on the new filter with the
WHERE condition.
Change the value of the filter from 10 to
20. Click Update Filter. The
SQL Query and Data Preview
panes update with the results of the modified query.
In the Close section, click Close Where to close the Where tab.
Import all SQL query results into the
MATLAB Workspace. In the Import section, click ![]() . In the Import Data dialog box, enter the name
. In the Import Data dialog box, enter the name
data for the MATLAB Workspace variable, and click OK. The MATLAB Workspace displays the table data.
Display the SQL query results at the command line.
data
data =

  2×6 table

    suppliernumber          suppliername              city           country          faxnumber       unitcost
    ______________    _________________________    __________    _______________    ______________    ________

    1008              'The Great Train Company'    'Nashua'      'United States'    '403 121 3478'    21
    1006              'ACME Toy Company'           'New York'    'United States'    '212 435 1618'    24
Find the maximum product price.
max(data.unitcost)
ans =

    24
In the Connections section, close the database connection by clicking Close Connection.
Note
If multiple connections are open, close the database connection of your choice by selecting the corresponding data source from the Close Connection list.
Connect to a Microsoft Access database using the Database Explorer app. Create a simple SQL query and sort the results by the data in one column. The Database Explorer app previews query results by default. Then, import the sorted data into the MATLAB workspace.
Set up the data source for the
tutorial.accdb database and name it dbdemo. For
details, see Microsoft Access ODBC for Windows.
In the Connections section of the Database Explorer tab, from the Connect list, select the data source for connection. The connection dialog box opens. Leave the user name and password blank, and click Connect.
The Database Explorer app creates a connection to the Microsoft Access database. The Database Browser pane displays the available tables in the database. The data source tab, which is named dbdemo, appears to the right of the Database Browser pane. The data source tab contains two empty panes, SQL Query and Data Preview.
In the Database Browser pane, select the inventorytable table. The SQL Query pane displays the SQL query that selects all columns and rows from this table. The Data Preview pane displays the first 10 rows of the query results.
Sort the results of the SQL query. In the Criteria section, click Order By to display the Order By tab in the toolstrip.
In the Add section, in the
Column list, select the
price column. Click Add
Sort.
In the Edit section, click Descending to sort the prices in decreasing order. The Data Preview pane displays the updated query results with sorted prices.

In the Close section, click Close Order By to close the Order By tab.
Import all SQL query results into the
MATLAB Workspace. In the Import section, click ![]() . In the Import Data dialog box, enter the name
. In the Import Data dialog box, enter the name
data for the MATLAB Workspace variable, and click OK. The MATLAB Workspace displays the table data.
In the Connections section, close the database connection by clicking Close Connection.
Note
If multiple connections are open, close the database connection of your choice by selecting the corresponding data source from the Close Connection list.
Connect to a Microsoft Access database using the Database Explorer app. Create a simple SQL query and filter the results. Use a text filter to retrieve specific rows of data. The Database Explorer app previews query results by default. Then, import the filtered data into the MATLAB workspace.
Set up the data source for the
tutorial.accdb database and name it dbdemo. For
details, see Microsoft Access ODBC for Windows.
In the Connections section of the Database Explorer tab, from the Connect list, select the data source for connection. The connection dialog box opens. Leave the user name and password blank, and click Connect.
The Database Explorer app creates a connection to the Microsoft Access database. The Database Browser pane displays the available tables in the database. The data source tab, which is named dbdemo, appears to the right of the Database Browser pane. The data source tab contains two empty panes, SQL Query and Data Preview.
In the Database Browser pane, select the producttable table. The SQL Query pane displays the SQL query that selects all columns and rows from this table. The Data Preview pane displays the first 10 rows of the query results.
Add filter criteria to the SQL query. In the Criteria section, click Where to display the Where tab in the toolstrip.
Filter for products with a product description that starts with the letter
S. In the Add section, in the
Column list, select
productdescription. In the
Operator list, select
LIKE. To filter for text, enclose the text in
single quotes. In the Value list, enter
'S%'.

Click Add Filter. The Data
Preview pane displays three rows of data. The product
description in each row starts with the letter S.

In the Close section, click Close Where to close the Where tab.
Import all SQL query results into the
MATLAB Workspace. In the Import section, click ![]() . In the Import Data dialog box, enter the name
. In the Import Data dialog box, enter the name
data for the MATLAB Workspace variable, and click OK. The MATLAB Workspace displays the table data.
In the Connections section, close the database connection by clicking Close Connection.
Note
If multiple connections are open, close the database connection of your choice by selecting the corresponding data source from the Close Connection list.
Connect to a Microsoft Access database using the Database Explorer app. Create a simple SQL query and remove duplicate rows from the query results. The Database Explorer app previews query results by default. After removing duplicates, import the data into the MATLAB workspace.
Set up the data source for the
tutorial.accdb database and name it dbdemo. For
details, see Microsoft Access ODBC for Windows.
In the Connections section of the Database Explorer tab, from the Connect list, select the data source for connection. The connection dialog box opens. Leave the user name and password blank, and click Connect.
The Database Explorer app creates a connection to the Microsoft Access database. The Database Browser pane displays the available tables in the database. The data source tab, which is named dbdemo, appears to the right of the Database Browser pane. The data source tab contains two empty panes, SQL Query and Data Preview.
In the Database Browser pane, select the producttable table. Clear all the boxes for columns in the producttable table except for suppliernumber. The SQL Query pane displays the SQL query that selects the suppliernumber column from this table. The Data Preview pane displays the first 10 rows of the query results.
Sort the results of the SQL query. In the Criteria
section, click Order By to display the
Order By tab in the toolstrip. In the
Add section, in the Column
list, select the suppliernumber column, and click
Add Sort.
In the Close section, click Close Order By to close the Order By tab.
The Data Preview pane displays the rows sorted in increasing order, which is the default order.

The Data Preview pane shows the duplicate supplier
number 1001.

In the Selection section, click Exclude
Duplicates to remove duplicate rows in the Data
Preview pane. The Database Explorer App adds the SQL
statement DISTINCT to the query in the SQL
Query pane. This statement removes duplicate rows from the
query results.

The Data Preview pane displays unique rows only.

Import all SQL query results into the
MATLAB Workspace. In the Import section, click ![]() . In the Import Data dialog box, enter the name
. In the Import Data dialog box, enter the name
data for the MATLAB Workspace variable, and click OK. The MATLAB Workspace displays the table data.
In the Connections section, close the database connection by clicking Close Connection.
Note
If multiple connections are open, close the database connection of your choice by selecting the corresponding data source from the Close Connection list.
Connect to a Microsoft Access database using the Database Explorer app. Enter an SQL query manually or paste an existing SQL query into the SQL Query pane. Then, import the query results into the MATLAB workspace.
Set up the data source for the
tutorial.accdb database and name it dbdemo. For
details, see Microsoft Access ODBC for Windows.
In the Connections section of the Database Explorer tab, from the Connect list, select the data source for connection. The connection dialog box opens. Leave the user name and password blank, and click Connect.
The Database Explorer app creates a connection to the Microsoft Access database. The Database Browser pane displays the available tables in the database. The data source tab, which is named dbdemo, appears to the right of the Database Browser pane. The data source tab contains two empty panes, SQL Query and Data Preview.
In the Query section, click
Manual. A new data source tab appears to the
right of the dbdemo tab with the name
dbdemo_manual. The suffix
_manual attached to the tab name indicates that you
are entering an SQL query manually.
Enter an SQL query in the SQL Query pane. Here,
select all columns and rows from the producttable table,
and rename the unitcost and
productdescription columns. Use the SQL statement
AS to create aliases.

In the Preview section, click Preview Query to preview the query results.
The Data Preview pane shows the results of the SQL query. The pane displays the first 10 rows of data by default.

Import all SQL query results into the
MATLAB Workspace. In the Import section, click ![]() . In the Import Data dialog box, enter the name
. In the Import Data dialog box, enter the name
data for the MATLAB Workspace variable, and click OK. The MATLAB Workspace displays the table data.
In the Connections section, close the database connection by clicking Close Connection.
Note
If multiple connections are open, close the database connection of your choice by selecting the corresponding data source from the Close Connection list.
Version History
Introduced in R2017b
See Also
Functions
Topics
- Connection Options
- Configure Driver and Data Source
- Create SQL Queries Using Database Explorer App
- Join Tables Using Database Explorer App
- Data Preview Using Database Explorer App
- Customize Import Options Using Database Explorer App
- Generate SQL Query and MATLAB Script
- Modify and Delete Data Sources
- Database Explorer App Error Messages