Verify and Prepare Spectral Analysis Algorithm for Deployment
This example shows how to verify and prepare a MATLAB® spectral analysis algorithm for deployment on an ARM® Cortex®-M55 processor. In this example, you:
Create MATLAB tests that execute the spectral analysis algorithm.
Generate C code by using Embedded® Coder™.
Check the generated C code for defects by using Polyspace® Bug Finder™.
Analyze the generated C code for run-time errors by using Polyspace® Code Prover™.
Test the generated C code for equivalence with the original MATLAB spectral analysis algorithm.
Review the project quality metrics by using the Code Quality Dashboard.
Prepare for continuous integration by using the MATLAB build tool.
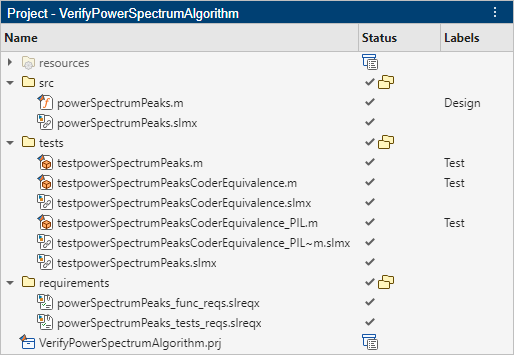
Examine Spectral Analysis Project
Open the VerifyPowerSpectrumAlgorithm project.
proj = openProject("VerifyPowerSpectrumAlgorithm");The project contains the entry-point function powerSpectrumPeaks. This function:
Calculates the Fourier transform of a time-domain signal
Obtains the power spectrum of the signal in the frequency domain by squaring the absolute value of the Fourier transform
Returns the peak frequencies of the power spectrum
type powerSpectrumPeaks.mfunction peaks = powerSpectrumPeaks(signal, fs, prominence) %#codegen
arguments
signal (1,:) double {coder.mustBeComplex}
fs (1,1) double
prominence (1,1) double
end
n = length(signal);
if n < 2
error('The signal must contain more than one sample for Fourier analysis.');
end
y = fft(signal);
power = abs(y).^2/n;
% Preallocate peakIndices with the maximum possible size
peakIndices = zeros(1, n);
peakCount = 0;
% Iterate through the power spectrum to find local maxima
for i = 2:n-1
if power(i) > power(i-1) && power(i) > power(i+1)
leftMin = min(power(1:i-1));
rightMin = min(power(i+1:end));
localProminence = power(i) - max(leftMin, rightMin);
if localProminence >= prominence
peakCount = peakCount + 1;
peakIndices(peakCount) = i;
end
end
end
peakIndices = peakIndices(1:peakCount);
peaks = (peakIndices-1)*fs/n;
end
The VerifyPowerSpectrumAlgorithm project contains these folders, which contain the files you need to run, test, and deploy the algorithm:
The
srcfolder contains the spectral analysis algorithm.The
testsfolder contains the tests that verify the functions, and the equivalence tests that generate the C code from the algorithm.The
requirementsfolder contains requirements that specify required behavior that the algorithm and its tests need to meet.The
srcandtestsfolders contain requirement links in SLMX files.
Assess Current Project Quality Metrics
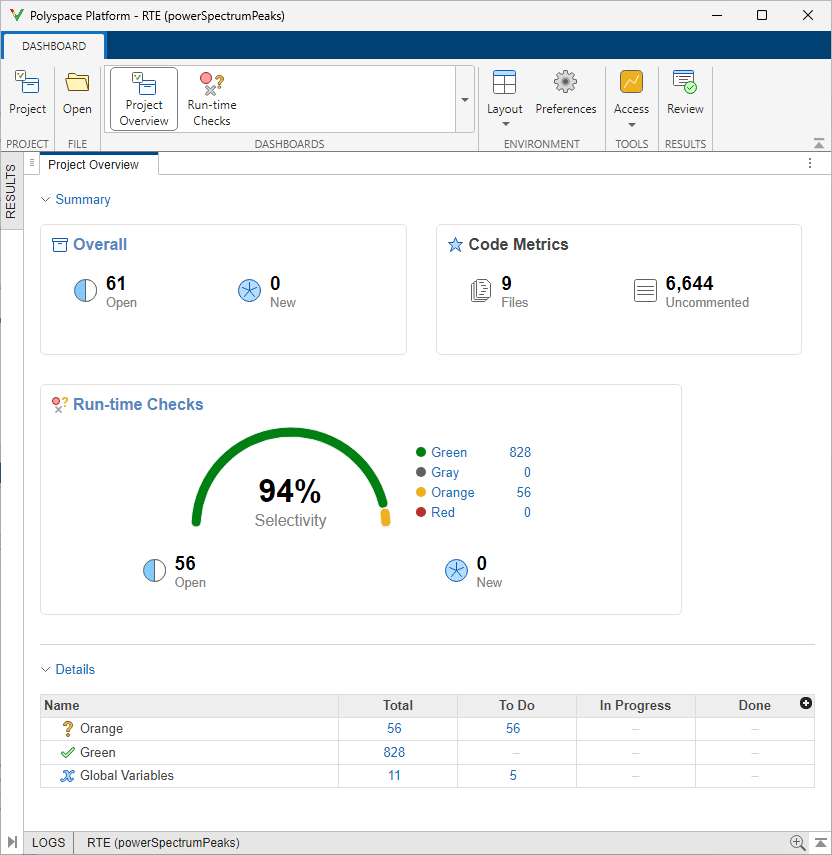
Open the Code Quality Dashboard. In the Project tab, in the Tools menu, under Apps, click Code Quality Dashboard.
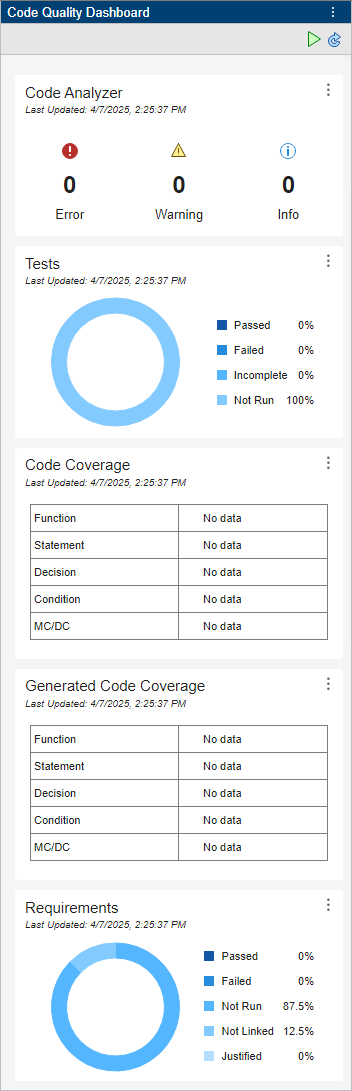
The Code Quality dashboard displays code analysis metrics, test results, the coverage results for the code coverage and generated code coverage results, and the requirement verification results. You can use the Code Quality Dashboard to assess the overall quality of your project.
Currently, there are no results for tests, coverage, and requirements verification because no tests have run. The next steps improve these quality metrics by running tests, collecting coverage, and linking requirements.
Test Spectral Analysis Algorithm
Before you generate C code from the power spectrum algorithm, test the code to verify that it behaves as required. To test the powerSpectrumPeaks function, first define the inputs.
Define a complex time-domain signal, x, that has two frequency components at 50 Hz and 300 Hz. fs is the sampling frequency and L is the length of the signal.
fs = 1000;
T = 1/fs;
L = 1500;
t = (0:L-1)*T;
signal = 0.7*exp(2*1i*pi*50*t) + 1.3*exp(2*1i*pi*300*t);
To filter the noise from the power spectrum, define a minimum peak prominence.
prominence = 0.001;
In the src folder of the project, open the powerSpectrumPeaks.m file. On the Editor tab, in the Test section, click Generate Test. A test file named testpowerSpectrumPeaks opens. The test function contains sections for the function inputs, the expected function output, the actual function output, and a qualification method that verifies that the actual value and expected value are the same.
% This is an autogenerated sample test for file powerSpectrumPeaks.m
classdef testpowerSpectrumPeaks < matlab.unittest.TestCase

    methods (Test)

        function test_powerSpectrumPeaks(testCase)
            % Specify the input(s) of powerSpectrumPeaks
            signal =
            fs = 2647.1849;
            prominence = -8049.1919;

            % Specify the expected output(s) of powerSpectrumPeaks
            expected_peaks =

            % Exercise the function powerSpectrumPeaks
            actual_peaks = powerSpectrumPeaks(signal, fs, prominence);

            testCase.verifyEqual(actual_peaks, expected_peaks);
        end
    end
end
Typically, you use the project requirements to complete this test by specifying inputs and expected outputs. For this example, use the testpowerSpectrumPeaks.m file, which contains the inputs and outputs for this example.
type testpowerSpectrumPeaks.mclassdef testpowerSpectrumPeaks < matlab.unittest.TestCase
methods (Test)
function test_powerSpectrumPeaks(testCase)
% Specify the input(s) of powerSpectrumPeaks
fs = 1000;
T = 1/fs;
LengthOfSignal = 1500;
t = (0:LengthOfSignal-1)*T;
signal = 0.7*exp(2*1i*pi*50*t)+1.3*exp(2*1i*pi*300*t);
prominence = 0.001;
% Specify the expected output(s) of powerSpectrumPeaks
expected_peaks = [50, 300];
% Exercise the function powerSpectrumPeaks
actual_peaks = powerSpectrumPeaks(signal, fs, prominence);
testCase.verifyEqual(actual_peaks, expected_peaks);
end
end
end
This test executes the powerSpectrumPeaks function for one set of input values. This test is a starting point to ensuring that the algorithm behaves as expected.
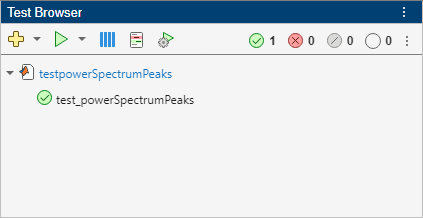
To run the test, open the completed testpowerSpectrumPeaks.m file.
edit testpowerSpectrumPeaks.mOn the Editor tab, in the Run Tests section, click Run Tests. The Test Browser opens and runs the test. The test passes.
Generate C Code
Next, generate C code for the powerSpectrumPeaks.m file. Configure a code generation configuration object for a static library. To mimic the runtime environment of the final deployable artifact on the target hardware, disable the OpenMP library. Generate C code for the powerSpectrumPeaks function by using the codegen command.
cfg = coder.config("lib");
cfg.EnableOpenMP = false;

inputArgs = {signal,fs,prominence};
codegen powerSpectrumPeaks -config cfg -args inputArgs -d codegenFolder
Code generation successful.
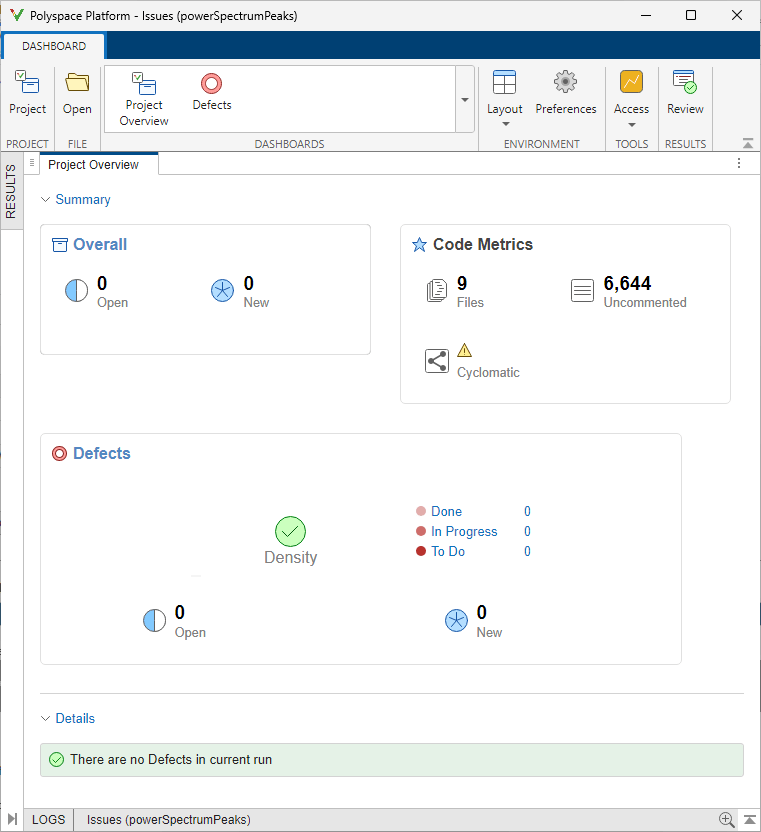
Check Generated Code for Defects
Use Polyspace® Bug Finder™ to perform an initial check for defects in the generated C code. Use the pslinkoptions function to configure the Polyspace analysis session for code generated by Embedded® Coder™. Store the results in a folder called results in the temporary folder for the system, and configure the analysis results to open in Polyspace Platform.
opts = pslinkoptions("ec");
opts.VerificationMode = "BugFinder";
opts.ResultDir = fullfile(tempdir,"results");
opts.OpenProjectManager = 1;
Analyze the generated code. To write the analysis results to a variable instead of printing them in the Command Window, use the evalc function to execute the pslinkrun function.
codegenFolder = fullfile(pwd,"codegenFolder");
bugFinderResult = evalc( ...
    'pslinkrun("-codegenfolder",codegenFolder,opts)');
The analysis results open in the Polyspace Platform window. The results indicate that there are no defects in the current run.
Analyze Generated Code for Run-Time Errors
Because the Polyspace Bug Finder analysis did not find any defects, you can use Polyspace® Code Prover™ to check the operations for overflow, divide-by-zero, out-of-bounds array access, and other run-time errors in the generated C code. Use the pslinkoptions function to configure the Polyspace analysis session for code generated by Embedded Coder. Store the results in a folder called results in the temporary folder for the system, and configure the analysis results to open in Polyspace Platform.
opts = pslinkoptions("ec");
opts.VerificationMode = "CodeProver";
opts.ResultDir = fullfile(tempdir,"results");
opts.OpenProjectManager = 1;
Analyze the generated code. To write the analysis results to a variable instead of printing them in the Command Window, use the evalc function to execute the pslinkrun function.
codeProverResult = evalc( ...
    'pslinkrun("-codegenfolder",codegenFolder,opts)');
The analysis results open in the Polyspace Platform window.
The analysis results indicate that there are no proven errors in the generated code.
Test Generated Code for Equivalence
To verify that the behavior of the generated C code matches the behavior of the MATLAB spectral analysis algorithm, create an equivalence test for the powerSpectrumPeaks function.
Open the powerSpectrumPeaks.m file. In MATLAB, on the Editor tab, in the Test section, click Generate Test > C/C++ Code Generation.
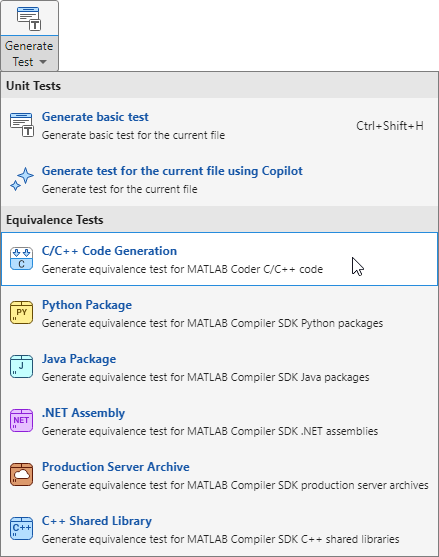
An equivalence test called testpowerSpectrumPeaksCoderEquivalence opens. The test function in the file contains a section that defines the function inputs, a method that generates C code from the powerSpectrumPeaks function, a method that executes the generated code by passing the function inputs, and a qualification method that verifies that the execution of the generated code matches the execution of the MATLAB code for the same inputs.
% This is an autogenerated sample test for file powerSpectrumPeaks.m
classdef testpowerSpectrumPeaksCoderEquivalence < matlabtest.coder.TestCase
    methods (Test)
        function test_powerSpectrumPeaksCoderEquivalence(testCase)
            functionToBuild = "powerSpectrumPeaks";

            % Specify the input(s) of powerSpectrumPeaks
            signal =
            fs =
            prominence =
            inputArgs = {signal, fs, prominence};

            % Build artifact
            buildResults = testCase.build(functionToBuild, Inputs=inputArgs);

            % Execute artifact
            executionResults = testCase.execute(buildResults);

            % Execute MATLAB code and compare
            testCase.verifyExecutionMatchesMATLAB(executionResults)
        end
    end
end
To complete the test, you must specify the inputs for the powerSpectrumPeaks function. Typically, you use the project requirements to complete this test. For this example, use the testpowerSpectrumPeaksCoderEquivalence.m file, which contains the inputs and outputs for this example. Additionally, the test generates a static C library by using the Configuration name-value argument of the build method. The test executes using software-in-the-loop (SIL) verification, which requires Embedded Coder, and does not use the OpenMP library.
type testpowerSpectrumPeaksCoderEquivalence.mclassdef testpowerSpectrumPeaksCoderEquivalence < matlabtest.coder.TestCase
methods (Test)
function test_powerSpectrumPeaksCoderEquivalence(testCase)
functionToBuild = "powerSpectrumPeaks";
% Specify the input(s) of powerSpectrumPeaks
fs = 1000;
T = 1/fs;
LengthOfSignal = 1500;
t = (0:LengthOfSignal-1)*T;
signal = 0.7*exp(2*1i*pi*50*t)+1.3*exp(2*1i*pi*300*t);
prominence = 0.001;
inputArgs = {signal, fs, prominence};
% Build artifact
cfg = coder.config("lib",ecoder=true);
cfg.EnableOpenMP = false;
buildResults = testCase.build(functionToBuild, Inputs=inputArgs, ...
Configuration=cfg);
% Execute artifact
executionResults = testCase.execute(buildResults);
% Execute MATLAB code and compare
testCase.verifyExecutionMatchesMATLAB(executionResults)
end
end
end
To run the test, open the completed testpowerSpectrumPeaksCoderEquivalence.m file.
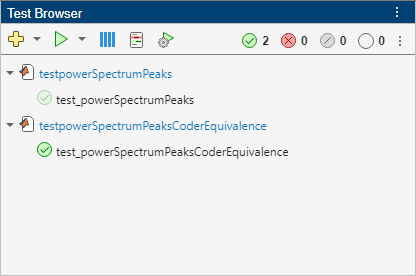
edit testpowerSpectrumPeaksCoderEquivalence.mOn the Editor tab, in the Run Tests section, click Run Tests. The Test Browser opens and runs the test. The test passes, which indicates that the generated C code has the same functional behavior as the MATLAB code for the specified inputs.
Equivalence Test Generated Code by Using Processor-in-the-Loop Execution
To verify the equivalence of the generated C code on the ARM Cortex-M55 processor, you can run a processor-in-the-loop (PIL) equivalence test. The test function in the testpowerSpectrumPeaksCoderEquivalence_PIL.m file defines the function inputs and the code generation settings, generates C code from the powerSpectrumPeaks function, executes the generated code by passing the function inputs, and verifies that the execution of the generated code matches the execution of the MATLAB code for the same inputs. The test defines code generation settings by using the coder.config function to create a code configuration object that:
Generates a static C library using parameters for an ARM Cortex-M55 processor on an MPS3 FPGA
Executes the generated code in PIL verification mode
Sets the maximum stack usage per application to 1024 bytes based on the available size in the hardware
Does not use the OpenMP library
type testpowerSpectrumPeaksCoderEquivalence_PIL.mclassdef testpowerSpectrumPeaksCoderEquivalence_PIL < matlabtest.coder.TestCase
methods (Test)
function test_powerSpectrumPeaksCoderEquivalence(testCase)
functionToBuild = "powerSpectrumPeaks";
% Specify the input(s) of powerSpectrumPeaks
fs = 1000;
T = 1/fs;
LengthOfSignal = 1500;
t = (0:LengthOfSignal-1)*T;
signal = 0.7*exp(2*1i*pi*50*t)+1.3*exp(2*1i*pi*300*t);
prominence = 0.001;
inputArgs = {signal, fs, prominence};
% Configure for PIL execution
cfg = coder.config("lib", ecoder=true);
cfg.Hardware = coder.hardware('ARM Cortex-M55 (MPS3)');
cfg.VerificationMode = "PIL";
cfg.StackUsageMax = 1024;
cfg.EnableOpenMP = false;
% Build artifact
buildResults = testCase.build(functionToBuild, Inputs=inputArgs, Configuration = cfg);
% Execute artifact
executionResults = testCase.execute(buildResults);
% Execute MATLAB code and compare
testCase.verifyExecutionMatchesMATLAB(executionResults)
end
end
end
The test optimizes the generated code for the ARM Cortex-M55 processor, which requires the Embedded Coder Support Package for ARM® Cortex®-M Processors. Running the test requires the Embedded Coder Interface to QEMU Emulator add-on. For more information about installing these add-ons, see Install Support for Embedded Coder Support Package for ARM Cortex-M Processors (Embedded Coder).
To run the test, open the completed testpowerSpectrumPeaksCoderEquivalence_PIL.m file.
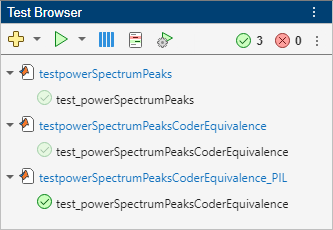
edit testpowerSpectrumPeaksCoderEquivalence_PIL.mOn the Editor tab, in the Run Tests section, click Run Tests. The Test Browser opens and runs the test. The test passes, which indicates that the C code generated for the ARM processor has the same functional behavior as the MATLAB code for the specified inputs.
Collect Project Quality Metrics by Using the MATLAB Test Manager
Now that the tests in the project pass, you can collect and review the project quality metrics in the Code Quality Dashboard. Use the MATLAB Test Manager to collect the metrics. To open the test manager, click the Tests section title in the Code Quality Dashboard. Alternatively, in the Project tab, in the Tools menu, under Apps, click MATLAB Test Manager.
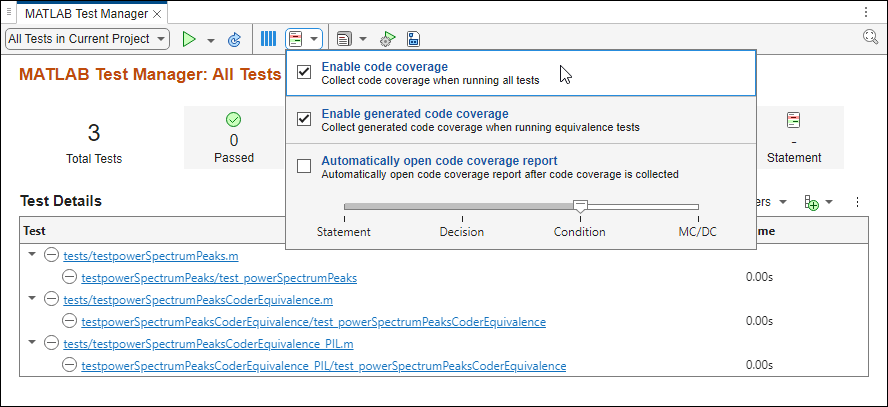
To collect code coverage when you run unit tests, click the Code Coverage button ![]() and select Enable MATLAB code coverage. To collect code coverage for generated C/C++ code when you run equivalence tests, select Enable generated code coverage. Set the coverage metric level to Condition.
and select Enable MATLAB code coverage. To collect code coverage for generated C/C++ code when you run equivalence tests, select Enable generated code coverage. Set the coverage metric level to Condition.
Run the tests by clicking the Run button ![]() . Update the results in the Code Quality Dashboard by clicking Refresh Metrics.
. Update the results in the Code Quality Dashboard by clicking Refresh Metrics.
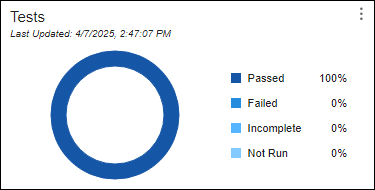
The Tests section of the dashboard shows that the tests pass.
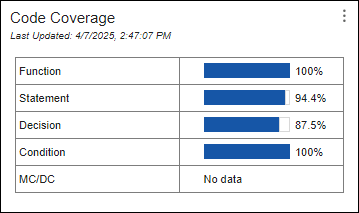
The Code Coverage section of the dashboard indicates that the function and condition coverage of the MATLAB source code is 100%, which indicates that the tests cover the source code. To view details about the coverage results, open the coverage report by clicking the MATLAB Code Coverage section title.
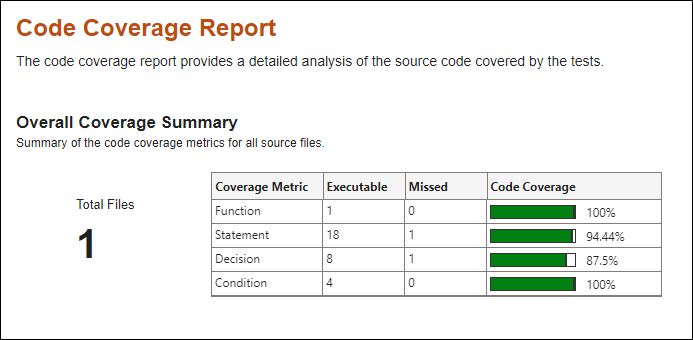
The coverage report shows the total number of executables and the number of missed executables for each coverage type. The report also shows a breakdown of the executables by source file. For more information about the types of code coverage, see Types of Code Coverage for MATLAB Source Code.
In the Code Quality Dashboard, the Generated Code Coverage section shows the code coverage for the generated code that the equivalence tests execute. To view details about the generated code coverage results, open the generated code coverage report by clicking the Generated Code Coverage section title. You can view the code coverage for the main C file, powerSpectrumPeaks.c, under Breakdown by Source.
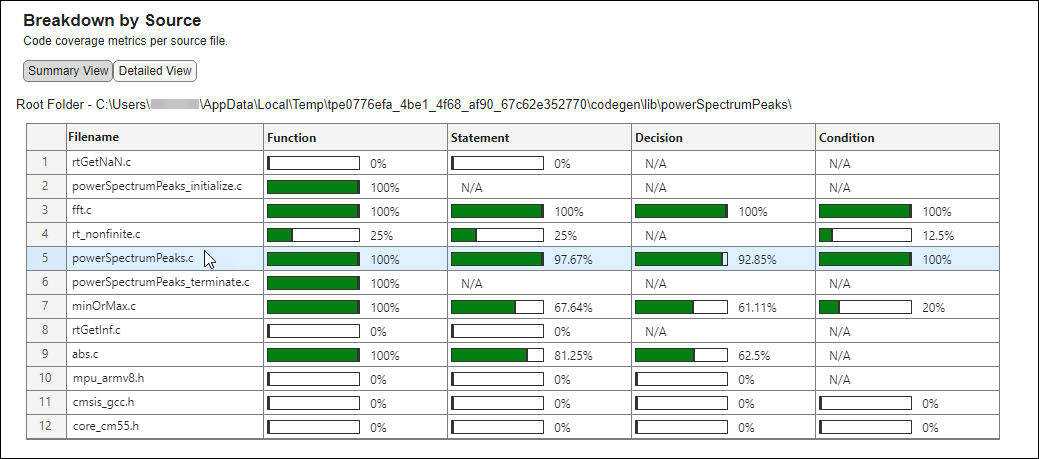
The function and condition coverage for powerSpectrumPeaks.c are both 100%, which indicates that the equivalence test adequately covers the generated C code.
Identify and Address Requirements Traceability Gaps
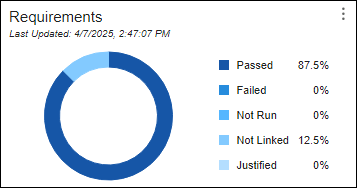
In the Code Quality Dashboard, the Requirements section indicates that 87.5% of the requirements in the project link to tests that passed, while 12.5% of the requirements do not link to tests.
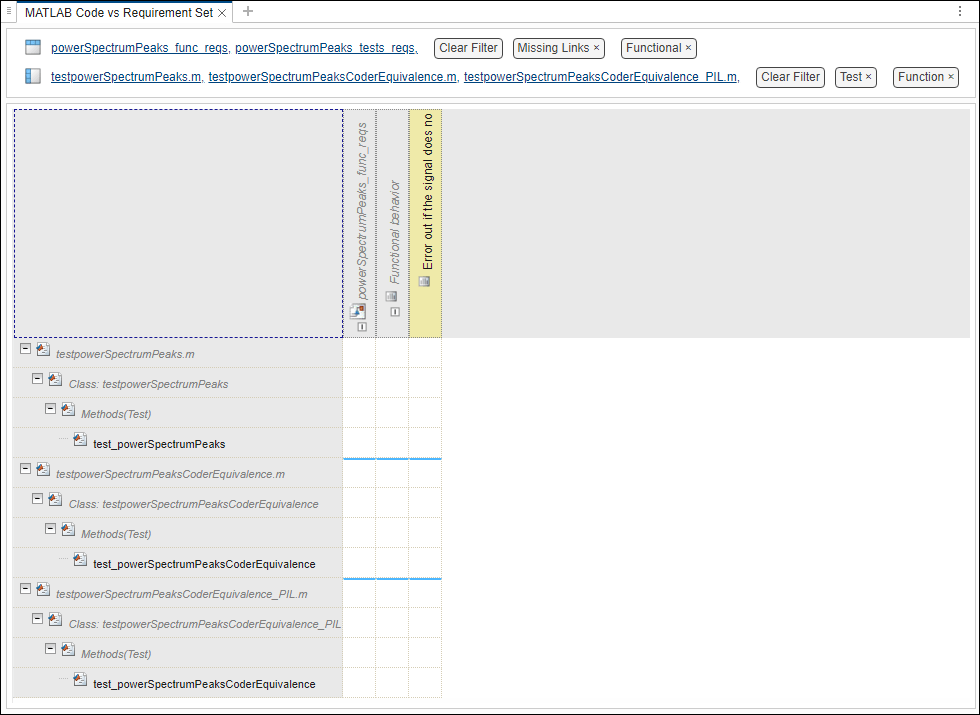
To identify and address the missing requirements traceability, create a traceability matrix that contains the requirements and tests in the project. Point to the Requirements section, click the three-dot icon ![]() , and select Generate Traceability Matrix.
, and select Generate Traceability Matrix.

To identify the requirements that do not link to tests, filter and highlight the traceability matrix. In the Filter Panel, in the Top section, filter the matrix to show only the functional requirements not linked to tests by clicking:
Top > Link > Missing Links
Top > Type > Functional
In the Left section, show only the test functions in the graph_unit_tests file by clicking:
Left > Type > Function
Left > Attributes > Test
Highlight the rows and columns that do not have links by clicking Highlight Missing Links in the toolstrip.
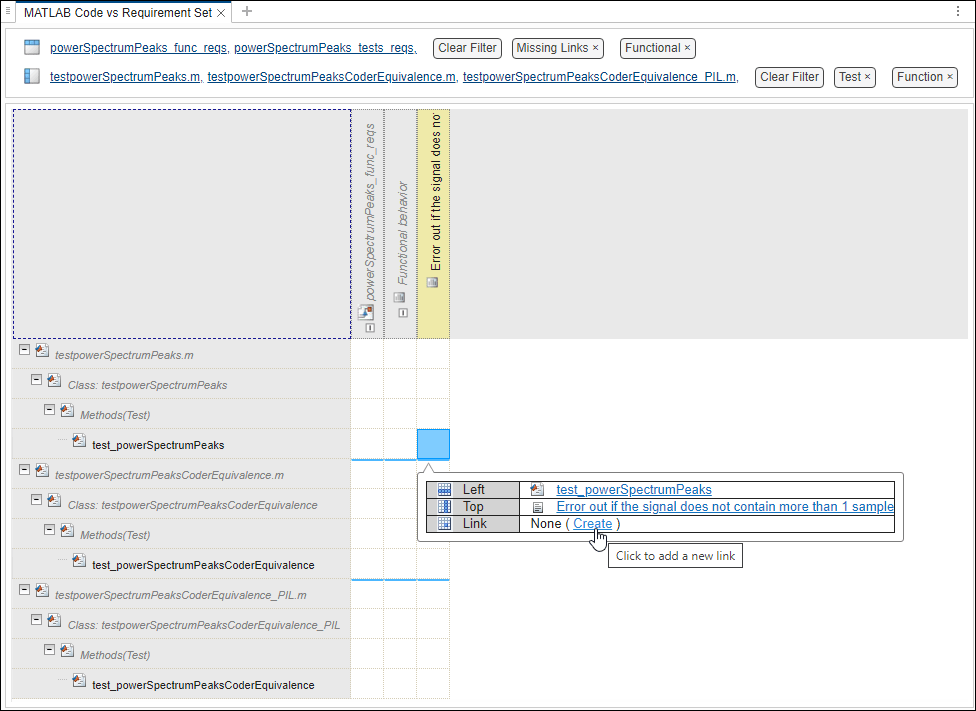
In a real-world situation, to prepare this code for deployment, you might investigate which tests verify the requirements that do not have links. In this example, the test_powerSpectrumPeaks test executes the powerSpectrumPeaks function which implements the Error out if the signal does not contain more than 1 sample requirement, so you can create a link from the test to the requirement. To create the link, click the cell that corresponds to the requirement and the test and select Create. In the Create Link dialog box, click Create.
Save the link set for the testPowerSpectrumPeaks.m file.
myLinkSet = slreq.load("testPowerSpectrumPeaks.m");
save(myLinkSet);
Update the Code Quality Dashboard by clicking Refresh Metrics.
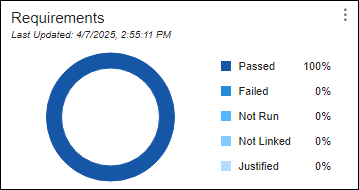
The percentage of requirements that link to tests that pass increases to 100%.
Document Quality by Generating Reports
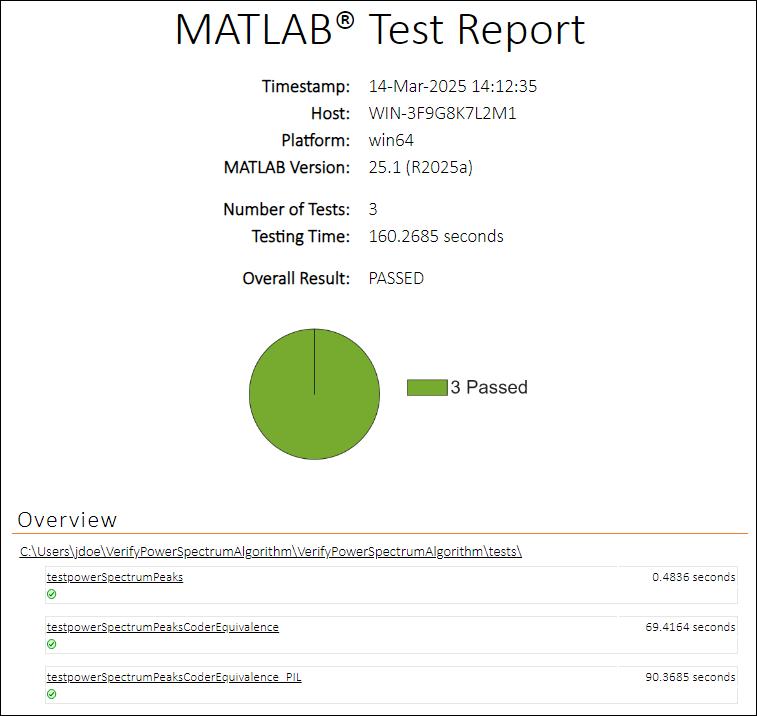
To document the quality of the project for certification purposes, generate a test report and a standalone coverage report.
To save the test results to a test report, in the MATLAB Test Manager, click the Report button ![]() and select Generate Test Result Report. In the dialog box that appears, select a location and enter a name for the report.
and select Generate Test Result Report. In the dialog box that appears, select a location and enter a name for the report.
To generate a standalone code coverage report for the MATLAB source code, you must programmatically collect code coverage results for the project. For example, first import the required classes.
import matlab.unittest.plugins.codecoverage.CoverageResult
import matlab.unittest.plugins.CodeCoveragePlugin
import matlabtest.coder.plugins.GeneratedCodeCoveragePlugin
Create a test suite that contains the tests in the project, and a test runner.
suite = matlab.unittest.TestSuite.fromProject(proj);
runner = testrunner("textoutput");
Customize the test runner using plugins that provides programmatic access to statement, function, decision, and condition coverage metrics for the MATLAB source code in the src folder and the generated C code.
format1 = CoverageResult;
codeCovPlugin = CodeCoveragePlugin.forFolder("src", ...
    Producing=format1,MetricLevel="condition");
format2 = CoverageResult;
genCodeCovPlugin = GeneratedCodeCoveragePlugin( ...
    Producing=format2,MetricLevel="condition");
addPlugin(runner,codeCovPlugin);
addPlugin(runner,genCodeCovPlugin);
Run the tests.
testResult = run(runner,suite);
Setting up ProjectFixture
Done setting up ProjectFixture: Project 'VerifyPowerSpectrumAlgorithm' is already loaded. Setup is not required.
__________

Running testpowerSpectrumPeaks
.
Done testpowerSpectrumPeaks
__________

Running testpowerSpectrumPeaksCoderEquivalence
.
Done testpowerSpectrumPeaksCoderEquivalence
__________

Running testpowerSpectrumPeaksCoderEquivalence_PIL
.
Done testpowerSpectrumPeaksCoderEquivalence_PIL
__________

Tearing down ProjectFixture
Done tearing down ProjectFixture: Teardown is not required.
__________
Get a handle to the MATLAB code coverage results. Generate a code coverage report from the code coverage results. Name the report MATLABCodeCoverageReport and save it as an HTML file in the project root folder.
results = format1.Result;
fp = fullfile(proj.RootFolder, ...
    "MATLABCodeCoverageReport.html");
generateStandaloneReport(results,fp)
Generating standalone report. Please wait.
    Preparing content for the standalone report.
    Adding content to the standalone report.
    Writing standalone report to file.
Get a handle to the generated C code coverage results. Generate a code coverage report from the generated code coverage results. Name the report GeneratedCodeCoverageReport and save it as an HTML file in the project root folder.
results = format2.Result;
fp = fullfile(proj.RootFolder, ...
    "GeneratedCodeCoverageReport.html");
generateStandaloneReport(results,fp)
Generating standalone report. Please wait.
    Preparing content for the standalone report.
    Adding content to the standalone report.
    Writing standalone report to file.
Automate Running Tests by Using Build Tool
After you verify the MATLAB algorithm, you can define a build that automates tasks, including running tests, by using the MATLAB Build Tool. You can run the tests locally or on a continuous integration (CI) platform.
To define a build for your project, create a build file for the MATLAB Build Tool. In the Project tab, click Run Build > Create build file.
MATLAB creates this build file, which defines and adds tasks to the build plan that:
Delete the outputs and traces of tasks
Analyze files in the project for code issues
Run the tests in the project and fails the build if one of the tests fails
function plan = buildfile
import matlab.buildtool.tasks.*

plan = buildplan(localfunctions);

plan("clean") = CleanTask;
plan("check") = CodeIssuesTask;
plan("test") = TestTask;

plan.DefaultTasks = ["check" "test"];
end
You can run the tasks in the build file locally by clicking Run Build or by using the buildtool function. You can also run the tasks on a CI platform that integrates with MATLAB. Running tests on a CI platform can help monitor for regressions in code functionality when multiple users submit code to a shared code repository. For more information, see Continuous Integration with MATLAB on CI Platforms.
Next Steps to Deploy Generated Code
After you verify the behavior of the MATLAB algorithm by creating and running requirements-based MATLAB tests and equivalence tests, you can deploy the generated code. To deploy the generated code, you create an application that uses the generated code to run outside of the MATLAB environment by following this process:
Create or use a C or C++ main function to call the entry-point functions in the generated code.
Cross-compile the code into an executable by using MATLAB Coder™ or Embedded Coder.
Package the generated code for transfer to the target platform by using the
packNGofunction.Transfer the compiled files to the target platform.
Execute and test the application on the target platform.
Optimize the code for performance and iterate through the deployment process.
For more information about deploying generated code, see Deploy Generated Code (MATLAB Coder). For an example, see Deploy Generated C Code to External Hardware: Raspberry Pi Examples (MATLAB Coder).
See Also
Apps
Functions
build|pslinkrun(Polyspace Code Prover) |pslinkoptions(Polyspace Code Prover) |buildtool