Interactively Simulate Vehicle Climate Control System
This example shows how you can use a dashboard of controls and displays to interactively simulate the climate control system of a car. You can adjust the fan and air recycling controls as well as set the internal temperature and modify the external temperature. A Linear Gauge block, a Dashboard Scope block, and a Display block show the internal temperature of the car. The model in this example adds the dashboard to the sldemo_auto_climatecontrol model. For more information about the underlying model, see Simulating Automatic Climate Control Systems.

Build the Dashboard Subsystem
This model uses a Subsystem block to gather the controls and displays in a single interface for the model. To create the subsystem in this example:
1. Add a Subsystem block to the sldemo_auto_climatecontrol model.
2. Delete the prepopulated contents of the subsystem. The subsystem does not need input ports or output ports because the dashboard blocks do not use ports to make connections.
3. Add the contents of the dashboard.
In the dashboard for this model:
Two Check Box blocks turn the fans and air recycling on and off.
A Knob block sets the internal temperature.
An Edit block allows you to specify the external temperature.
A Dashboard Scope block displays the value of the internal temperature over time.
A Linear Gauge block displays the instantaneous internal temperature value.
A Display block shows the instantaneous internal temperature value.
You can use areas in the subsystem to group and label related controls and displays. For more information about creating areas, see Visually Organize Models Using Area Annotations.
Connect Blocks to Model
To explore connections between each block in the Dashboard subsystem and the model, you can select a block in the dashboard, pause on the ellipsis that appears above it, and click Jump to Connected Element. The Simulink® editor navigates to and highlights the block or signal connected to that block in the dashboard.
The Check Box blocks connect to the dist_req and recycle_air constant blocks. In the sldemo_auto_climatecontrol model, the fan and air recycling signals are controlled by Manual Switch blocks with two Constant blocks as inputs.
To replace a Manual Switch block in the sldemo_auto_climatecontrol model with a Check Box block:
1. Delete the Manual Switch block and one of the Constant blocks.
2. Connect the other Constant block directly to the Mux block.
3. Specify a variable as the Constant block value.
This model uses the variable dist_req to control the fans and the variable recycle_air to control air recycling.
4. Click the Unrecognized functions or variables error, and create the variable in the Model Workspace.
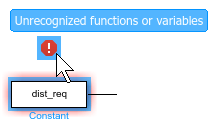
Now, the variable dist_req holds the state of the fans.
5. Press Ctrl+D to update the diagram so the variable you just created is available for connection.
6. Connect the Check Box block to the dist_req variable.
Follow a similar process to replace the air recycling manual switch.
The Knob block connects to the USet parameter of the User Setpoint in Celsius masked subsystem. Similarly, the Edit block connects to the x parameter of the External Temperature in Celsius masked subsystem. The Dashboard Scope, Linear Gauge, and Display blocks all connect to the output signal of the Kelvin to Celsius subsystem.
Interactive Simulation
This model uses simulation pacing to slow model execution so you can interact with the model during simulation. For more information, see Simulation Pacing Options.
Run the simulation. Use the Check Box blocks to control the fans and air recycling. Use the Knob block to adjust the internal temperature set point, and specify the external temperature with the Edit block. You can observe the resulting internal temperature on the Dashboard Scope block, the Linear Gauge block, and the Display block.
See Also
Blocks
- Check Box | Dashboard Scope | Display | Knob | Linear Gauge