Communicate Using ThingSpeak TalkBack on Android
This example shows how to use the Simulink® Support Package for Android® Devices to perform these actions on ThingSpeak™ TalkBack queue commands: delete all commands, add a command, execute next commands, and display last executed command. You can view these actions, along with their statuses, on an application deployed on your Android device or on the ThingSpeak TalkBack channel.
Prerequisites
For more information on how to use the Simulink Support Package for Android Devices to run a Simulink model on your Android device, see Getting Started with Android Devices.
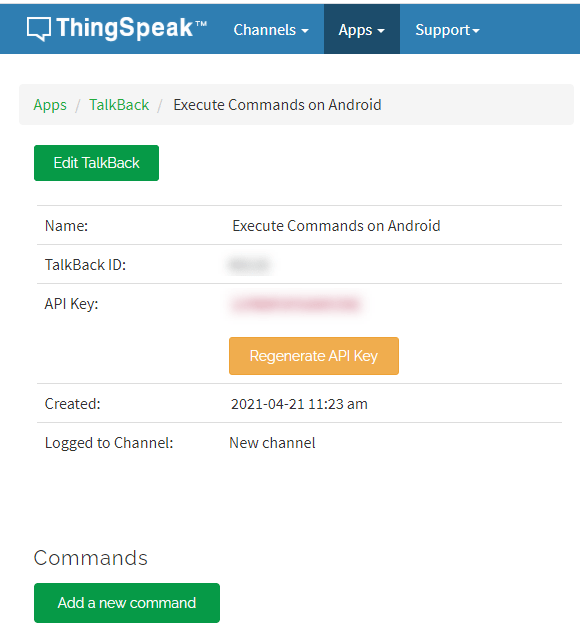
Set up a new TalkBack. Go to ThingSpeak TalkBack web interface and follow these steps.
a. Select Apps > TalkBack > New TalkBack.
b. Enter a valid Name for the TalkBack.
c. Set Log to Channel to New channel.
d. Click Save TalkBack, creating a new TalkBack.

Required Hardware
Android device, such as a phone or tablet
Configure Simulink Model and Calibrate Parameters
Open the androidTalkBackExample Simulink model.
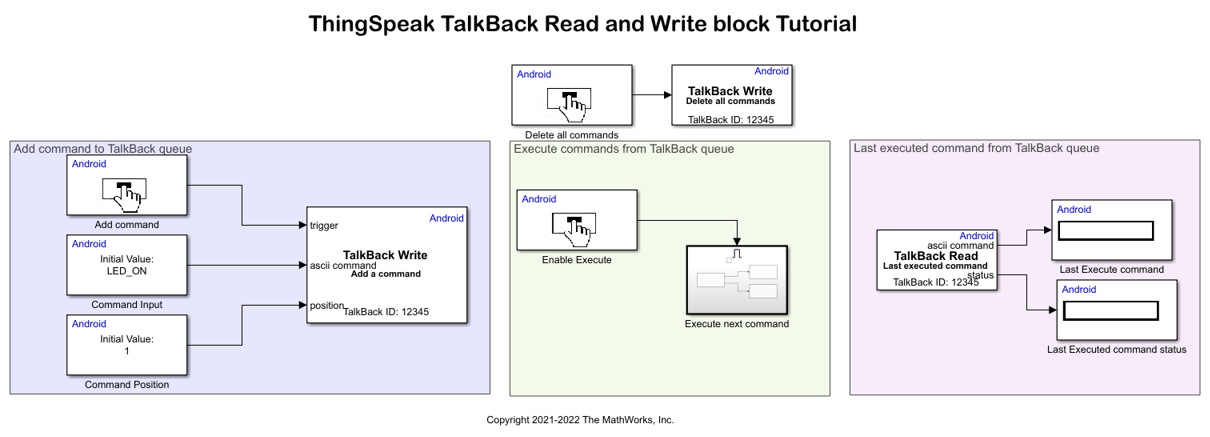
Use the Button blocks in the Simulink model to control the actions performed on the ThingSpeak TalkBack commands.
Delete All Commands
You can delete all commands from the ThingSpeak TalkBack queue. The Delete all commands Button block creates an interactive widget in the application that is deployed on the Android device. When you press the button in the application, the associated TalkBack Write block activates and deletes all commands from the TalkBack queue.
Configure these parameters in the Delete all commands Button Block Parameters dialog box.
1. Set Button state to Not pressed.
2. Set Sample time to 1.
Configure these parameters in the associated TalkBack Write Block Parameters dialog box.
1. Set TalkBack API to Delete all commands.
2. Set the TalkBack ID and API key parameters to the corresponding values from the ThingSpeak TalkBack web interface.
Add Command to TalkBack Queue
You can write commands to the TalkBack API and specify their positions in the queue. In the Add command to TalkBack queue section of the model, the Add command Button block creates an interactive widget in the application. When you press the button, the associated TalkBack Write block adds a command to the TalkBack queue at every sample time specified in the TalkBack Write block. This example adds the command LED_ON to the TalkBack queue.
Configure these parameters in the Button Block Parameters dialog box.
1. Set Button state to Not pressed.
2. Set Sample time to 1.
The Command Input Data Input block specifies the command to add to the TalkBack queue. Configure these parameters in the Data Input Block Parameters dialog box.
1. Select Character vector input.
2. Set Initial value to LED_ON.
3. Set Number of characters to 100.
4. Set Sample time to 1.
The Command Position Data Input block specifies the position in the TalkBack queue at which to add the command. Configure these parameters in the Data Input Block Parameters dialog box.
1. Set Initial value to 1.
2. Set Data type to uint16.
3. Set Sample time to 1.
Configure these parameters in the TalkBack Write Block Parameters dialog box.
1. Set TalkBack API to Add a command.
2. Set the TalkBack ID and API key parameters to the corresponding values from the ThingSpeak TalkBack web interface.
3. Set Command type to ASCII vector.
4. Select Specify position.
Execute Commands from TalkBack Queue
You can display the commands that have been executed from the TalkBack queue in the application. In the Execute next command subsystem, the TalkBack Read block reads the next executed command from the queue and deletes it. It also displays the status of the TalkBack command execution.
Configure these parameters in the Enable Execute Button Block Parameters dialog box.
1. Set Button state to Not pressed.
2. Set Sample time to 0.1.
Configure these parameters in the TalkBack Read Block Parameters dialog box.
1. Set TalkBack API to Execute next command.
2. Enter the TalkBack ID and API key parameters from the ThingSpeak TalkBack web interface.
3. Set Command type to ASCII vector.
4. Set Command length to 7.
5. Set Sample time to -1.
Last Executed Command from TalkBack Queue
You can display the last executed command from the TalkBack queue in the application. In the Last executed command from TalkBack queue section of the Simulink model, the TalkBack Read block reads the last executed command from the queue and displays it in the application. It also displays the status of the TalkBack command execution.
Configure these parameters in the TalkBack Read Block Parameters dialog box.
1. Set TalkBack API to Last executed command.
2. Set the TalkBack ID and API key parameters to the corresponding values from the ThingSpeak TalkBack web interface.
3. Set Command type to ASCII vector.
4. Set Command length to 7.
5. Set Sample time to 1.
Deploy Simulink Model on Android
1. On the Hardware tab of the Simulink model, in the Mode section, select Run on board and then click Build, Deploy & Start. The androidTalkBackExample application launches automatically.

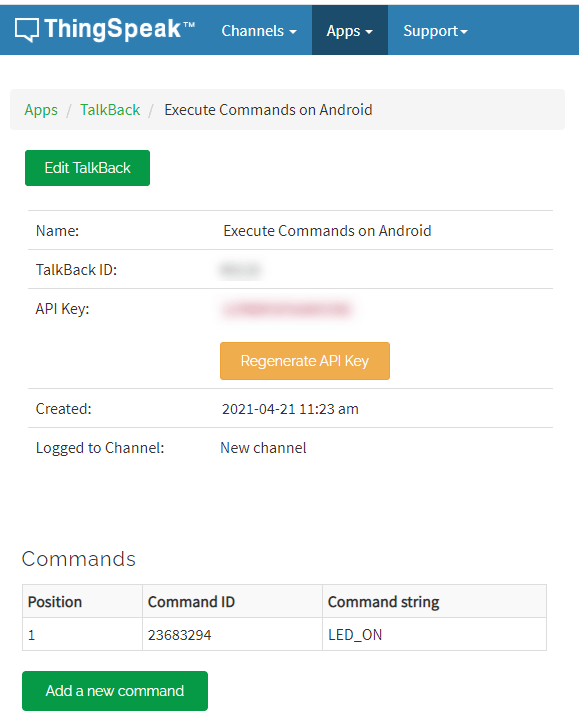
2. Open the ThingSpeak TalkBack channel on the web interface.
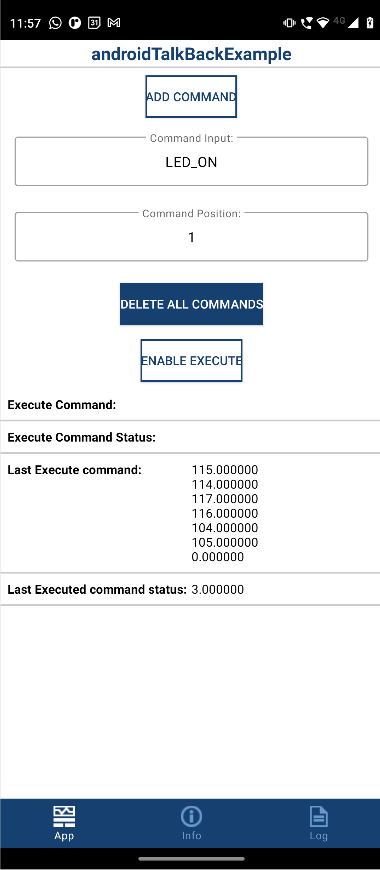
3. Press Delete All Commands on the application. Observe that all the commands in the TalkBack queue are deleted.
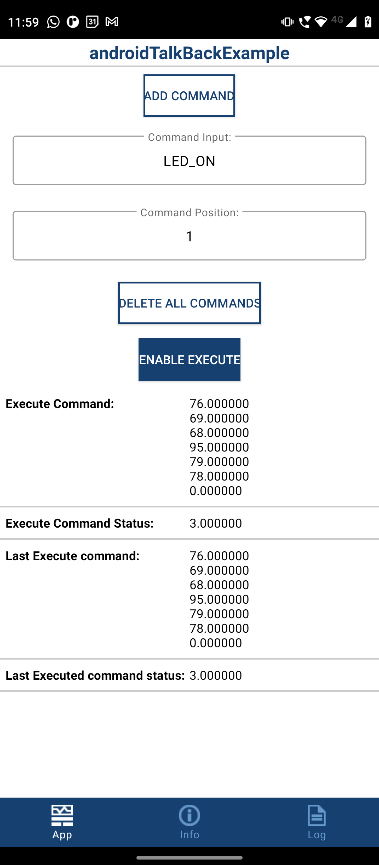
Observe the Delete All Commands executed on the androidTalkBackExample application.
Observe the Delete All Commands executed on the ThingSpeak TalkBack queue.
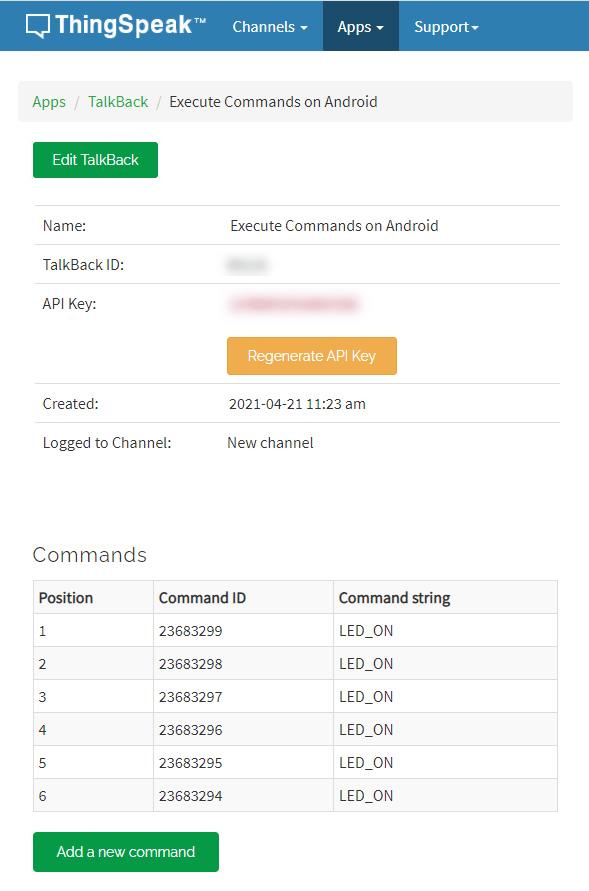
4. Select Add command in the application. Note that the command LED_ON is added to the TalkBack queue at every position.
Observe the LED_ON command added in the androidTalkBackExample application.

Observe the LED_ON command added to the ThingSpeak TalkBack queue.
5. Select Enable Execute in the application. Observe that, at each sample time, the command LED_ON is executed and then removed from the TalkBack queue. Also, note that the ASCII equivalent of the command is displayed in the application.
Observe the command executed on the androidTalkBackExample application.

Observe the command executed on the ThingSpeak TalkBack queue.
Observe the last executed command in the androidTalkBackExample application.
androidTalkBackExample Application
The androidTalkBackExample application has three sections:
1. App — Press the button widgets to perform actions on the commands in the TalkBack queue. You can scroll down in the application for a complete view of the command queue.
2. Info — This section provides details such as the IP address of the connected Android device, the device serial number, and the name of the model deployed on the Android device.
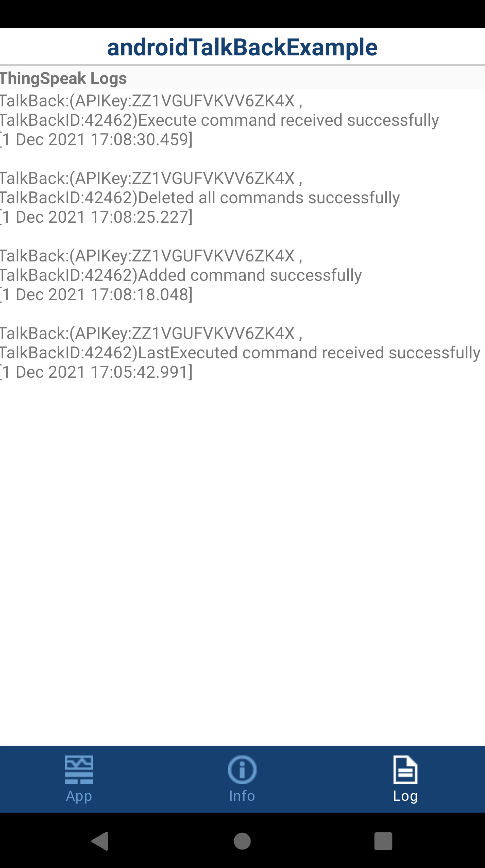
3. Log — Use this section to verify whether or not the application successfully executes the commands.
See Also
Select a Web Site
Choose a web site to get translated content where available and see local events and offers. Based on your location, we recommend that you select: United States.
You can also select a web site from the following list
Americas
- América Latina (Español)
- Canada (English)
- United States (English)
Europe
- Belgium (English)
- Denmark (English)
- Deutschland (Deutsch)
- España (Español)
- Finland (English)
- France (Français)
- Ireland (English)
- Italia (Italiano)
- Luxembourg (English)
- Netherlands (English)
- Norway (English)
- Österreich (Deutsch)
- Portugal (English)
- Sweden (English)
- Switzerland
- United Kingdom (English)