Actualización de canales y control de luces en Arduino
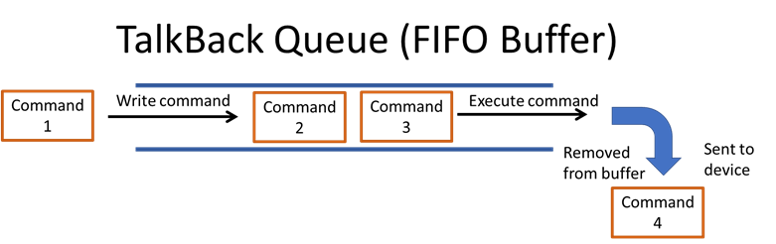
Este ejemplo muestra cómo actualizar su canal y recuperar comandos de una cola ThingSpeak™ TalkBack. Utilice los comandos para cambiar el estado del LED integrado.
Utilice TalkBack cuando su aplicación involucre una máquina que desee ejecutar solo cuando haya un comando en la cola.

Puede actualizar su canal simultáneamente y recuperar el último comando guardado en una cola de TalkBack. Agregue el parámetro talkback_key a su solicitud POST y ThingSpeak devuelve el último comando TalkBack en la respuesta.
Hardware compatible
Arduino Uno o placa Arduino similar con Wi-Fi Shield
MKR1000
Requisitos previos
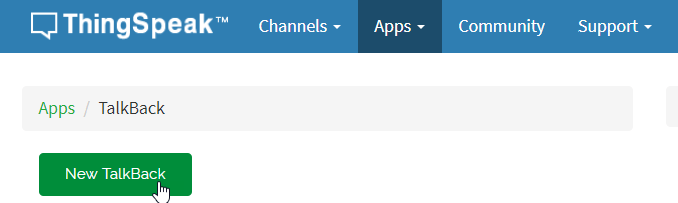
Debe tener al menos un canal configurado para completar este ejemplo. Cree un canal como se muestra en Collect Data in a New Channel y registre la clave API de escritura. También necesitas configurar un TalkBack. Ve a Aplicaciones > TalkBacks y elige Nuevo TalkBack.
Agregar comandos a la cola de TalkBack
Puedes agregar comandos a una cola de TalkBack de dos maneras.
Utilice la interfaz web de ThingSpeak TalkBack para agregar comandos a la cola de TalkBack. Puede configurar TalkBack para tener hasta 8000 comandos.
Utilice la API de ThingSpeak. Puede utilizar una solicitud HTTP POST para agregar un comando a la cola. En el siguiente POST, reemplace
TALKBACK_ID,YOUR_TALKBACK_API_KEY,TALKBACK_COMMANDyPOSITION_NUMBERcon el correspondiente valores de tu canal.
POST https://api.thingspeak.com/talkbacks/TALKBACK_ID/commands
 api_key=YOUR_TALKBACK_API_KEY
     command_string=TALKBACK_COMMAND
     position=POSITION_NUMBER
Programe su dispositivo
1) Descargue el último IDE de Arduino®.
2) Agregue WiFi101 al Administrador de biblioteca, si aún no está allí.
a) Seleccione Sketch > Incluir biblioteca > Administrar bibliotecas.
b) Seleccione la biblioteca WiFi101 y haga clic en Instalar.
3) Agregue SPI al Administrador de biblioteca, si aún no está allí.
a) Seleccione Sketch > Incluir biblioteca > Administrar bibliotecas. Busque SPI.
b) Seleccione SPI para agregarlo a su boceto.
4) En el menú Herramientas, seleccione el puerto y la placa apropiados en el IDE de Arduino.
5) Pegue el código en el IDE de Arduino. Agregue la información de su red Wi-Fi, su clave API de TalkBack y su número de TalkBack.
6) Programe el dispositivo y luego observe el monitor serie y el LED para observar los cambios cuando se consumen los comandos. Cada comando que se ejecuta se elimina de la lista. Debe agregar más comandos a la lista una vez que se consuman.
Código
1) Comience incluyendo las bibliotecas apropiadas y definiendo variables. Ingrese el SSID y la contraseña de su red. Edite el número de canal y los parámetros de TalkBack para ID y clave API.
/*
WriteMultipleFieldsAndFetchCommandFromTalkBack

Description: Checks a TalkBack queue every 60 seconds and sets the state of the built-in LED according
             to the latest command fetched. Turn the LED on and off by using the commands TURN_ON and TURN_OFF.
             The TalkBack documentation can be found at https://www.mathworks.com/help/thingspeak/talkback-app.html.


Hardware: Arduino Wi-Fi Shield 101

Notes:
- Requires WiFi101 library. Use the WiFi101 library version 0.13.0 or older. WiFi101 library versions 0.14.0 and newer have a bug
  that prevents this ThingSpeak library from working properly.
- Make sure the WiFi Shield 101 has updated firmware. Find instructions at https://www.arduino.cc/en/Tutorial/FirmwareUpdater.

Copyright 2018, The MathWorks, Inc.
*/

#include "ThingSpeak.h"
#include <SPI.h>
#include <WiFi101.h>

char ssid[] = <enter your SSID>;   // your network SSID (name)
char pass[] = <enter your password>;   // your network password

WiFiClient  client;

unsigned long myChannelNumber = <enter your channel ID>;
unsigned long myTalkBackID = <enter your TalkBack ID>;
const char * myTalkBackKey = <enter your TalkBack API key>;

// Some values to send to ThingSpeak
int number1 = 0;
int number2 = random(0,100);
int number3 = random(0,100);
int number4 = random(0,100);
2) En la función setup , inicialice el LED e inicie el monitor serie.
void setup() {
  pinMode(LED_BUILTIN, OUTPUT);  // Set up LED
  Serial.begin(115200);  // Initialize serial
}
3) En el bucle principal, comience estableciendo una conexión a la red inalámbrica local. Cree el mensaje POST a partir de los números generados aleatoriamente. Envíe la solicitud POST, verifique el resultado y busque un comando TalkBack. Luego genere nuevos números aleatorios para la próxima actualización del canal en 20 segundos.
void loop() {

  // Connect or reconnect to Wi-Fi
  if(WiFi.status() != WL_CONNECTED){
    Serial.print("Attempting to connect to SSID: ");
    Serial.println(String(ssid);
    while(WiFi.status() != WL_CONNECTED){
      WiFi.begin(ssid, pass);
      Serial.print(".");
      delay(5000);
    }
    Serial.println("\nConnected.");
  }

  // Create the message body for the POST out of the values
  String postMessage =  String("field1=") + String(number1) +
                        String("&field2=") + String(number2) +
                        String("&field3=") + String(number3) +
                        String("&field4=") + String(number4) +
                        String("&api_key=") + String(myWriteAPIKey) +
                        String("&talkback_key=") + String(myTalkBackKey);


   // Make a string for any commands in the queue
  String newCommand = String();

  // Make the POST to ThingSpeak
  int x = httpPOST(postMessage, newCommand);
  client.stop();

  // Check the result
  if(x == 200){
    Serial.println("checking queue...");
    // check for a command returned from TalkBack
    if(newCommand.length() != 0){

      Serial.print("  Latest command from queue: ");
      Serial.println(newCommand);

      if(newCommand == "TURN_ON"){
        digitalWrite(LED_BUILTIN, HIGH);
      }

      if(newCommand == "TURN_OFF"){
        digitalWrite(LED_BUILTIN, LOW);
      }
    }
    else{
      Serial.println("  Nothing new.");
    }

  }
  else{
    Serial.println("Problem checking queue. HTTP error code " + String(x));
  }

  // Confirm code works by changing values
  number1++;
  if(number1 > 99){
    number1 = 0;
  }
  number2 = random(0,100);
  number3 = random(0,100);
  number4 = random(0,100);

  delay(20000); // Wait 20 seconds to update the channel again
}
4) Utilice la función httpPOST para publicar datos en ThingSpeak y leer el siguiente comando de TalkBack.
// General function to POST to ThingSpeak
int httpPOST(String postMessage, String &response){

  bool connectSuccess = false;
  connectSuccess = client.connect("api.thingspeak.com",80);

  if(!connectSuccess){
      return -301;
  }

  postMessage += "&headers=false";

  String Headers =  String("POST /update HTTP/1.1\r\n") +
                    String("Host: api.thingspeak.com\r\n") +
                    String("Content-Type: application/x-www-form-urlencoded\r\n") +
                    String("Connection: close\r\n") +
                    String("Content-Length: ") + String(postMessage.length()) +
                    String("\r\n\r\n");

  client.print(Headers);
  client.print(postMessage);

  long startWaitForResponseAt = millis();
  while(client.available() == 0 && millis() - startWaitForResponseAt < 5000){
      delay(100);
  }

  if(client.available() == 0){
    return -304; // Didn't get server response in time
  }

  if(!client.find(const_cast<char *>("HTTP/1.1"))){
      return -303; // Couldn't parse response (didn't find HTTP/1.1)
  }

  int status = client.parseInt();
  if(status != 200){
    return status;
  }

  if(!client.find(const_cast<char *>("\n\r\n"))){
    return -303;
  }

  String tempString = String(client.readString());
  response = tempString;

  return status;

}