Resultados de
Hi, I am sending data from my device to the thingspeak server using HTTP and I'm trying to attach a timestamp with my uploads. I am using the created_at field in the request to set the time zone. A sample request looks like this
I live in India and my timezone offset is 5 hours 30 min. When I specify it like as shown above, I can see in the private view of my channel that it is adding 5 hours 30 min to the given time zone. So this time stamp becomes 21:04. How do I fix this? Am I making some mistake in my time zone offset in created_at? Or is there some time zone setting that is not set properly in my channel?
Thanks, Ashwin N
I followed the instructions here: Bulk-Update Using an Arduino or an ESP8266
And came up the following code for GSM module:
      const char apn[] = "www";
      const char gprsUser[] = "";
      const char gprsPass[] = "";
const char simPIN[] = "";
      const char server[] = "api.thinkspeak.com";
      const int port = 80;
char jsonBuffer[500] = "["; // Initialize the jsonBuffer to hold data
      // TTGO T-Call pins
      #define MODEM_RST            5
      #define MODEM_PWKEY          4
      #define MODEM_POWER_ON       23
      #define MODEM_TX             27
      #define MODEM_RX             26
#define SerialMon Serial
#define SerialAT Serial1
#define TIMEOUT 5000
// Configure TinyGSM library
#define TINY_GSM_MODEM_SIM800 // Modem is SIM800
#define TINY_GSM_RX_BUFFER 1024 // Set RX buffer to 1Kb #include <TinyGsmClient.h>
#ifdef DUMP_AT_COMMANDS
#include <StreamDebugger.h>
StreamDebugger debugger(SerialAT, SerialMon);
TinyGsm modem(debugger);
#else
TinyGsm modem(SerialAT);
#endifTinyGsmClient client(modem);
      #define IP5306_ADDR          0x75
      #define IP5306_REG_SYS_CTL0  0x00
/* Collect data once every 15 seconds and post data to ThingSpeak channel once every 2 minutes */
unsigned long lastConnectionTime = 0; // Track the last connection time
unsigned long lastUpdateTime = 0; // Track the last update time
const unsigned long postingInterval = 60L * 1000L; // Post data every 2 minutes
const unsigned long updateInterval = 15L * 1000L; // Update once every 15 seconds void setup() {
SerialMon.begin(115200); // Set modem reset, enable, power pins
pinMode(MODEM_PWKEY, OUTPUT);
pinMode(MODEM_RST, OUTPUT);
pinMode(MODEM_POWER_ON, OUTPUT);
digitalWrite(MODEM_PWKEY, LOW);
digitalWrite(MODEM_RST, HIGH);
digitalWrite(MODEM_POWER_ON, HIGH); // Set GSM module baud rate and UART pins
SerialAT.begin(115200, SERIAL_8N1, MODEM_RX, MODEM_TX);
delay(3000); SerialMon.println("Initializing modem...");
modem.init();// Configure the wake up source as timer wake up
        SerialMon.print("Connecting to APN: ");
        SerialMon.print(apn);
        if (!modem.gprsConnect(apn, gprsUser, gprsPass)) {
          SerialMon.println(" fail");
        }
        else {
          SerialMon.println(" OK");
SerialMon.print("Connecting to ");
SerialMon.print(server);
if (!client.connect(server, port)) { SerialMon.println(" Fail");
}
else {
SerialMon.println(" OK");
}
}}
      void loop() {
        // If update time has reached 1 second, then update the jsonBuffer
        if (millis() - lastUpdateTime >=  updateInterval) {
          updatesJson(jsonBuffer);
        }
}
      // Updates the josnBuffer with data
      void updatesJson(char* jsonBuffer){
        /* JSON format for updates paramter in the API
         *  This examples uses the relative timestamp as it uses the "delta_t". You can also provide the absolute timestamp using the "created_at" parameter
         *  instead of "delta_t".
         *   "[{\"delta_t\":0,\"field1\":-70},{\"delta_t\":3,\"field1\":-66}]"
         */
        // Format the jsonBuffer as noted above
        strcat(jsonBuffer,"{\"delta_t\":");
        unsigned long deltaT = (millis() - lastUpdateTime)/1000;
        size_t lengthT = String(deltaT).length();
        char temp[4];
        String(deltaT).toCharArray(temp,lengthT+1);
        strcat(jsonBuffer,temp);
        strcat(jsonBuffer,",");
        int h = hallRead();
        strcat(jsonBuffer, "\"field1\":");
        lengthT = String(h).length();
        String(h).toCharArray(temp,lengthT+1);
        strcat(jsonBuffer,temp);
        strcat(jsonBuffer,"},");
        // If posting interval time has reached 2 minutes, update the ThingSpeak channel with your data
        if (millis() - lastConnectionTime >=  postingInterval) {
              size_t len = strlen(jsonBuffer);
              jsonBuffer[len-1] = ']';
              httpRequest(jsonBuffer);
        }
        lastUpdateTime = millis(); // Update the last update time
      }
// Updates the ThingSpeakchannel with data
void httpRequest(char* jsonBuffer) {
/* JSON format for data buffer in the API
* This examples uses the relative timestamp as it uses the "delta_t". You can also provide the absolute timestamp using the "created_at" parameter
* instead of "delta_t".
* "{\"write_api_key\":\"YOUR-CHANNEL-WRITEAPIKEY\",\"updates\":[{\"delta_t\":0,\"field1\":-60},{\"delta_t\":15,\"field1\":200},{\"delta_t\":15,\"field1\":-66}]
*/
// Format the data buffer as noted above
char data[500] = "{\"write_api_key\":\"XXXXXXXXXXXXXXXX\",\"updates\":"; // Replace YOUR-CHANNEL-WRITEAPIKEY with your ThingSpeak channel write API key
strcat(data,jsonBuffer);
strcat(data,"}");
// Close any connection before sending a new request
client.stop();
String data_length = String(strlen(data)+1); //Compute the data buffer length
Serial.println(data);
// POST data to ThingSpeak
if (client.connect(server, 80)) {
client.println("POST /channels/1300373/bulk_update.json HTTP/1.1"); // Replace YOUR-CHANNEL-ID with your ThingSpeak channel ID
client.println("Host: api.thingspeak.com");
client.println("User-Agent: mw.doc.bulk-update (ESP8266)");
client.println("Connection: close");
client.println("Content-Type: application/json");
client.println("Content-Length: "+data_length);
client.println();
client.println(data);
String answer=getResponse();
Serial.println( answer );
}
else {
Serial.println("Failure: Failed to connect to ThingSpeak");
}
delay(250); //Wait to receive the response
client.parseFloat();
String resp = String(client.parseInt());
Serial.println("Response code:"+resp); // Print the response code. 202 indicates that the server has accepted the response
jsonBuffer[0] = '['; //Reinitialize the jsonBuffer for next batch of data
jsonBuffer[1] = '\0';
lastConnectionTime = millis(); //Update the last conenction time
} String getResponse(){
String response;
long startTime = millis(); delay( 200 );
while ( client.available() < 1 && (( millis() - startTime ) < TIMEOUT ) ){
delay( 5 );
} if( client.available() > 0 ){ // Get response from server.
char charIn;
do {
charIn = client.read(); // Read a char from the buffer.
response += charIn; // Append the char to the string response.
} while ( client.available() > 0 );
}
client.stop(); return response;
}The Response code I was getting initially was "0" Upon consulting the forum I added a new function to get response and here is the message it produced:
HTTP/1.1 405 Not Allowed
Server: nginx
Date: Wed, 17 Feb 2021 06:27:54 GMT
Content-Type: text/html
Content-Length: 8911
Connection: close
ETag: "5e5304fb-22cf"
X-DIS-Request-ID: 82c8c8535e18295aaeec025d18d14375
Set-Cookie: dis-remote-addr=1.39.31.10
Set-Cookie: dis-timestamp=2021-02-16T22:27:54-08:00
Set-Cookie: dis-request-id=82c8c8535e18295aaeec025d18d14375
X-Frame-Options: sameorigin
Please help me understand this error and rectify the code. P.S. I was able to run the code using WiFi module of the ESP32, so is this something to do with 256 limit? If so, how do I rectify it?
After I give the commands I get a response like this
AT+CIPSTART="TCP","api.thingspeak.com","80" OK
CONNECT OK AT+CIPSEND > GET https://api.thingspeak.com/update?api_key=Q03CA55P7NVGA8S8&field1=23 SEND OK
CLOSED
But the field charts are not updated in the website. And the data widget shows "no data available to show". And the number of entries remains 0. kindly help me out why I didn't get the values.
I have an Esp8266 weather station and I want the graphs in thingspeak to display customary units instead of metric. How do I do it?
Hello,
I would like to share a channel with some users, but when I do it, they can see the channel in "Channels share with me" but when they open the channel the can not see the data inside. There is a message saying: You don't have permission to view that channel! Do you know why is that? Thank you.
Hi there, my PI submitted some (3) wrong values to my channel. I didn't find am opportunity to remove them. Can anoyone help or give me a hint? Those 3 wrong values are killing my statistic and let the chart look very wrog due to those peaks Thanx to you
ok I want to extract all those rows in a table where one column has strings in which it shall contain the word "change" specifically after the word "terms" . text is : May not be redeemed for cash or combined with any other offer or coupon. Not valid on clearance (merchandise ending in .98). May not be applied to taxes, previous purchases, or the purchase of gift cards. Non-transferable. Terms are subject to change at any time. Product styles are subject to availability. See store associate for details.
Hello, I am interested in creating an IoT academic project, but I have encountered two difficulties: 1- It is necessary that in the ThingSpeak interface you can see a live camera. I have not found documentation or any information on how to do it. Yes, I know that you can import data from other websites (copy XPath), but I have not achieved it with traffic cameras from local websites. 2- I also need to act remotely on actuators, is this possible in ThingSpeak?
I would appreciate an honest answer, since in case of not being able to implement these solutions, I will have to find another platform or method to carry out this. Regards!
Hi,
I would like to export data from my channel. My channel receives data every 15 minutes but I would like to export the data similar to what I can see when I change the chart/field's timescale to 60 minutes.
Thanks!
Hi everyone,
I have been using Thingspeak for quite some time now for monitoring data for my wife‘s greenhouse. She accesses those data via the public view of the channel. So far, so good.
Now someone has used the „feature“ to add a comment to that view. Nothing serious, but my wife isn‘t happy. Therefore she asked me to remove the comment, and to set things up in such a way that comments can no longer be added.
Thus my two questions: 1. How can I delete the comment? 2. How can I disable comments made by not signed on users?
The channel in question is https://thingspeak.com/channels/971602
With best regards
Volker Bandke
MATLAB Answers will now properly handle the use of the '*@*' character when you want to get someone's attention. This behavior is commonly referred to as 'mentioning' or 'tagging' someone and is a feature found in most communication apps.
Why we are doing this
To help with communication and potentially speed up conversations. Also, it turns out many of you have been typing the @ character in Answers already, even though the MATLAB Answers site didn't behave in the expected way.
How it works
Once you type the @ character a popup will appear listing the community members already in the Q/A thread, as you keep typing the list will expand to include members not in the thread. A mentioned user will receive a notification when the question/answer/comment is posted. Each mention in the Q/A thread will have a new visual style and link to the user profile for that community member.
If you don't want to get 'mentioned' you can turn off the setting in your communication preferences located on your profile page .
We hope you will find this feature helpful and as always please reply with any feedback you may have.
We have created a new community for users of ThingSpeak. This new community is for students, researchers, and engineers looking to use MATLAB, Simulink, and ThingSpeak for Internet of Things applications. You can find the latest ThingSpeak news, tutorials to jump-start your next IoT project, and a forum to engage in a discussion on your latest cloud-based project. You can see answers to problems other users have solved and share how you solved a problem.
Christopher Stapels will be moderating the new ThingSpeak community .
We encourage you to visit the new community and share best practices, examples, and ask questions.
I'm presently working on an Air Quality monitor to be able to check the status of my environment and remote environments on ThingSpeak. I was planning on using the BME680 sensor. Does anyone have any experience with this or other air quality sensors? I'm looking probably for CO2 and the like (Volatile Organics), not so much particle sensors, though a combination may be best.
Hi,
I set at the Chart Options Results on 40320, what should be one week. But the graph shows only 36 hours (and some minutes). I also try to set it results on 7 day, but still I get only 36 hours.
Why it is not showing 7 days graph?
Frank
https://thingspeak.com/channels/1222127
Happy New Year, everyone! We hope you enjoyed the Cody contest in 2020, learned new MATLAB skills, and made a friend or two. While the 2020 contest has concluded, the fun and learning never end.
Please take the 1-minute survey to talk about your experience (only 2 required questions). Our goal is to make future contests better and more appealing to you, so your feedback is critical to us.
Thank you in advance and hope to see you again in the 2021 contest.
Ameer Hamza had a great 2020 and has been awarded the coveted MOST ACCEPTED answers badge for all his contributions in MATLAB Answers this past year. Ameer joins Walter Roberson and Image Analyst in receiving this award going all the way back to 2012!
There are 10 community members who have achieved the Top Downloads badge for their popular File Exchange submissions in 2020. Do you recognize any of these names? There's a good chance you've used one or more of their toolboxes or scripts in your work if you're a frequent visitor to File Exchange, if you're not you might want to check out what they've posted, it may save you a lot of time writing your own code.
--------------------- Top Downloads Badge Winners -----------------
- PIRC
- Scott Lowe
- Yair Altman
- Dr. Siva Malla
- Chad Greene
- Seyedali Mirjalili
- Giampiero Campa
- Rodney Tan
- John D'Errico
- Steve Miller
Congratulations to all these winners and a giant THANK YOU for all they've done this past year to help everyone in the MATLAB Central community!
Right now ThingSpeak supports up to 8 fields of data plus the status and three position fields. If you could have more fields, how many would you want? I have one channel of control settings for a project that I would have used up to 12, but no more than that.
Did you know you can change your user id? We went through a short time where everyone was auto assigned a long user id with 'mwa' and a bunch of numbers that couldn't be changed. You can now make it something more relevant to your actual IoT persona. Click on your user picture or icon on the upper right. Select 'My Profile' and click the Edit button under username. Share your interesting IoT themed names here.
- Use the new exportapp function to capture an image of your app|uifigure
- MATLAB's getframe now supports apps & uifigures
- Review: How to get the handle to an app figure
Use the new exportapp function to capture an image of your app|uifigure
Imagine these scenarios:
- Your app contains several adjustable parameters that update an embedded plot and you'd like to remember the values of each app component so that you can recreate the plot with the same dataset
- You're constructing a manual for your app and would like to include images of your app
- You're app contains a process that automatically updates regularly and you'd like to store periodic snapshots of your app.
As of MATLABs R2020b release , we no longer must rely on 3rd party software to record an image of an app or uifigure.
exportapp(fig,filename) saves an image (JPEG | PNG | TIFF | PDF) of a uifigure ( fig) with the specified file name or full file path ( filename). MATLAB's documentation includes an example of how to add an [Export] button to an app that allows the user to select a path, filename, and extension for their exported image.
Here's another example that merely saves the image as a PDF to the app's main folder.
1. Add a button to the app and assign a ButtonPushed callback function to the button. This one also assigns an icon to the button in the form of an svg file.

2. Define the callback function to name the image after the app's name and include a datetime stamp. The image will be saved to the app's main folder.
% Button pushed function: SnapshotButton
function SnapshotButtonPushed(app, ~)
    % create filename containing the app's figure name (spaces removed)
    % and a datetime stamp in format yymmdd_hhmmss
    filename = sprintf('%s_%s.pdf',regexprep(app.MyApp.Name,' +',''), datestr(now(),'yymmdd_HHMMSS'));
    % Get the app's path
    filepath = fileparts(which([mfilename,'.mlapp']));
    % Store snapshot
    exportapp(app.MyApp, fullfile(filepath,filename))
end
Matlab's getframe now supports apps & uifigures
getframe(h) captures images of axes or a uifigure as a structure containing the image data which defines a movie frame. This function has been around for a while but as of r2020b , it now supports uifigures. By capturing consecutive frames, you can create a movie that can be played back within a Matlab figure (using movie ) or as an AVI file (using VideoWriter ). This is useful when demonstrating the effects of changes to app components.
The general steps to recording a process within an app as a movie are,
1. Add a button or some other event to your app that can invoke the frame recording process.
2. Animation is typically controlled by a loop with n iterations. Preallocate the structure array that will store the outputs to getframe. The example below stores the outputs within the app so that they are available by other functions within the app. That will require you to define the variable as a property in the app.
% nFrames is the number of iterations that will be recorded.
% recordedFrames is defined as a private property within the app
app.recordedFrames(1:nFrames) = struct('cdata',[],'colormap',[]);
3. Call getframe from within the loop that controls the animation. If you're using VideoWriter to create an AVI file, you'll also do that here (not shown, but see an example in the documentation ).
% app.myAppUIFigure: the app's figure handle
% getframe() also accepts axis handles
for i = 1:nFrames
... % code that updates the app for the next frame
      app.recordedFrames(i) = getframe(app.myAppUIFigure);
  end
4. Now the frame data are stored in app.recordedFrames and can be accessed from anywhere within the app. To play them back as a movie,
movie(app.recordedFrames)
% or
movie(app.recordedFrames, n) % to play the movie n-times
movie(app.recordedFrames, n, fps) % to specify the number of frames per second
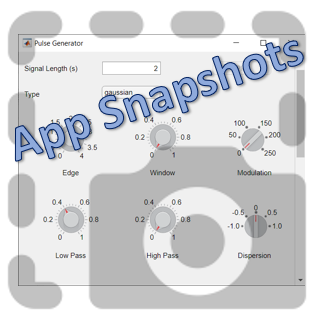
To demonstrate this, I adapted a copy of Matlab's built-in PulseGenerator.mlapp by adding
- a record button
- a record status lamp with frame counter
- a playback button
- a function that animates the effects of the Edge Knob
Recording process (The GIF is a lot faster than realtime and only shows part of the recording) (Open the image in a new window or see the attached Live Script for a clearer image).
Playback process (Open the image in a new window or see the attached Live Script for a clearer image.)
Review: How to get the handle to an app figure
To use either of these functions outside of app designer, you'll need to access the App's figure handle. By default, the HandleVisibility property of uifigures is set to off preventing the use of gcf to retrieve the figure handle. Here are 4 ways to access the app's figure handle from outside of the app.
1. Store the app's handle when opening the app.
app = myApp;
% Get the figure handle
figureHandle = app.myAppUIFigure;
2. Search for the figure handle using the app's name, tag, or any other unique property value
allfigs = findall(0, 'Type', 'figure'); % handle to all existing figures
figureHandle = findall(allfigs, 'Name', 'MyApp', 'Tag', 'MyUniqueTagName');
3. Change the HandleVisibility property to on or callback so that the figure handle is accessible by gcf anywhere or from within callback functions. This can be changed programmatically or from within the app designer component browser. Note, this is not recommended since any function that uses gcf such as axes(), clf(), etc can now access your app!.
4. If the app's figure handle is needed within a callback function external to the app, you could pass the app's figure handle in as an input variable or you could use gcbf() even if the HandleVisibility is off.
See a complete list of changes to the PulseGenerator app in the attached Live Script file to recreate the app.