Specify Types of Entry-Point Inputs Using the App
Define or Edit an Input Parameter Type
The following procedure shows you how to define or edit double,
single, int64, int32,
int16, int8, uint64,
uint32, uint16, uint8,
logical, and char types.
For more information about defining other types, see the information in this table.
| Input Type | Link |
|---|---|
| A string scalar (1-by-1 string array) | Specify a String Scalar Input Parameter |
| A structure (struct) | Specify a Structure Input Parameter |
| A cell array (cell (Homogeneous) or cell (Heterogeneous)) | Specify a Cell Array Input Parameter |
| A fixed-point data type (embedded.fi) | Specify a Fixed-Point Input Parameter |
| A constant (Define Constant) | Specify a Constant Input Parameter |
| An enumerated type | Specify an Enumerated Type Input Parameter |
| A global variable | Specify Global Variable Type and Initial Value Using the App |
| A value class object | Specify Objects as Inputs in the MATLAB Coder App |
| An input by example (Define by Example) | Define Input Parameter by Example by Using the App |
| An input automatically Autodefine Input Types | Automatically Define Input Types by Using the App |
Click the field to the right of the input parameter name.
Optionally, for numeric types, to make the parameter a complex type, select the Complex number check box.
Select the input type.
The app displays the selected type and the size options.
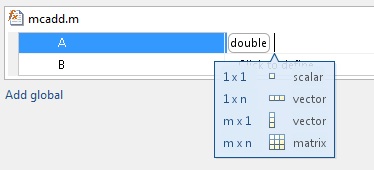
From the list, select whether your input is a scalar, a
1 x
                        n
vector, am x 1vector, or am x nmatrix. By default, if you do not select a size option, the app defines inputs as scalars.Optionally, if your input is not scalar, enter sizes
mandn. You can specify:Fixed size, for example,
10.Variable size, up to a specified limit, by using the
:prefix. For example, to specify that your input can vary in size up to10, enter:10.Unbounded variable size by entering
:Inf.
You can edit the size of each dimension.
Specify a String Scalar Input Parameter
To specify that an input is a string scalar:
On the Define Input Types page, click Let me enter input or global types directly.
Click the field to the right of the input parameter that you want to define.
Select string. Then select
1x1 scalar.The type is a 1-by-1 string array (string scalar) that contains a character vector.

To specify the size of the character vector, click the field to the right of the string array element
{1}. Select char. Then, select1xn vectorand enter the size.To make the string variable-size, click the second dimension.
To specify that the second dimension is unbounded, select
:Inf.To specify that the second dimension has an upper bound, enter the upper bound, for example
8. Then, select:8.
Specify an Enumerated Type Input Parameter
To specify that an input uses the enumerated type MyColors:
Suppose that the enumeration
MyColorsis on the MATLAB® path.classdef MyColors < int32 enumeration green(1), red(2), end endOn the Define Input Types page, click Let me enter input or global types directly.
In the field to the right of the input parameter, enter
MyColors.
Specify a Fixed-Point Input Parameter
To specify fixed-point inputs, Fixed-Point Designer™ software must be installed.
On the Define Input Types page, click Let me enter input or global types directly.
Click the field to the right of the input parameter that you want to define.
Select embedded.fi.
Select the size. If you do not specify the size, the size defaults to
1x1.Specify the input parameter
numerictype(Fixed-Point Designer) andfimath(Fixed-Point Designer) properties.If you do not specify a local fimath, the app uses the default fimath. See Default fimath Usage to Share Arithmetic Rules (Fixed-Point Designer).
To modify the numerictype (Fixed-Point Designer) or fimath (Fixed-Point Designer) properties, open the properties dialog box. To open the
properties dialog box, click to the right of the fixed-point type definition.
Optionally, click ![]() .
.
Specify a Structure Input Parameter
When a primary input is a structure, the app treats each field as a separate input. Therefore, you must specify properties for all fields of a primary structure input in the order that they appear in the structure definition:
For each field of an input structure, specify class, size, and complexity.
For each field that is a fixed-point class, also specify numerictype, and fimath.
Specify Structures by Type
On the Define Input Types page, click Let me enter input or global types directly.
Click the field to the right of the input parameter that you want to define.
Select struct.
The app displays the selected type,
struct. The app displays the size options.Specify that your structure is a scalar,
1 x nvector,m x 1vector, orm x nmatrix. By default, if you do not select a size option, the app defines inputs as scalars.If your input is not scalar, enter sizes for each dimension. Click the dimension. Enter the size. Select from the size options. For example, for size
10:To specify fixed size, select
10.To specify variable size with an upper bound of
10, select:10.To specify unbounded variable size, select
:Inf.
Optionally, specify properties for the structure in the generated code. See Set Structure Properties.
Add fields to the structure. Specify the class, size, and complexity of the fields. See Add a Field to a Structure.
Set Structure Properties
Click to the right of the structure definition. Optionally, click
 .
.In the dialog box, specify properties for the structure in the generated code.
Property Description C type definition name Name for the structure type in the generated code.
Type definition is externally defined Default:
No— type definition is not externally defined.If you select
Yesto declare an externally defined structure, the app does not generate the definition of the structure type. You must provide it in a custom include file.Dependency:
C type definition nameenables this option.C type definition header file Name of the header file that contains the external definition of the structure, for example,
"mystruct.h". Specify the path to the file using the Additional include directories parameter on the project settings dialog box Custom Code tab.By default, the generated code contains
#includestatements for custom header files after the standard header files. If a standard header file refers to the custom structure type, then the compilation fails. If you specify the C type definition header file, the app includes that header file exactly at the point where it is required.Dependency:
When Type
                                                definition is externally defined
is set toYes, this option is enabled.Data alignment boundary The run-time memory alignment of structures of this type in bytes.
If you have an Embedded Coder® license and use Code Replacement Libraries (CRLs), the CRLs provide the ability to align data objects passed into a replacement function to a specified boundary. You can take advantage of target-specific function implementations that require aligned data. By default, the structure is not aligned on any specific boundary so it is not matched by CRL functions that require alignment.
Alignment must be either
-1or a power of2that is no more than128.Default:
0Dependency:
When Type definition is externally
                                                defined
is set toYes, this option is enabled.
Rename a Field in a Structure
Select the name field of the structure that you want to rename. Enter the new name.
Add a Field to a Structure
To the right of the structure, click

Enter the field name. Specify the class, size, and complexity of the field.
Insert a Field into a Structure
Select the structure field below which you want to add another field.
Right-click the structure field.
Select Insert Field Below.
The app adds the field after the field that you selected.
Enter the field name. Specify the class, size, and complexity of the field.
Remove a Field from a Structure
Right-click the field that you want to remove.
Select Remove Field.
Specify a Cell Array Input Parameter
For code generation, cell arrays are homogeneous or heterogeneous. See Code Generation for Cell Arrays. A homogeneous cell array is represented as an array in the generated code. All elements have the same properties. A heterogeneous cell array is represented as a structure in the generated code. Elements can have different properties.
Specify a Homogeneous Cell Array
On the Define Input Types page, click Let me enter input or global types directly.
Click the field to the right of the input parameter that you want to define.
Select cell (Homogeneous).
The app displays the selected type,
cell. The app displays the size options.From the list, select whether your input is a scalar, a
1 x
                            n
vector, am x 1vector, or am x nmatrix. By default, if you do not select a size option, the app defines inputs as scalars.If your input is not scalar, enter sizes for each dimension. Click the dimension. Enter the size. Select from the size options. For example, for size
10:To specify fixed size, select
10.To specify variable size with an upper bound of
10, select:10.To specify unbounded variable size, select
:Inf.
Below the cell array variable, a colon inside curly braces
{:}indicates that the cell array elements have the same properties (class, size, and complexity).To specify the class, size, and complexity of the elements in the cell array, click the field to the right of
{:}.
Specify a Heterogeneous Cell Array
On the Define Input Types page, click Let me enter input or global types directly.
Click the field to the right of the input parameter that you want to define.
Select cell (Heterogeneous).
The app displays the selected type,
cell. The app displays the size options.Specify that your structure is a scalar,
1 x nvector,m x 1vector, orm x nmatrix. By default, if you do not select a size option, the app defines inputs as scalars.Optionally, if your input is not scalar, enter sizes
mandn. A heterogeneous cell array is fixed size.The app lists the cell array elements. It uses indexing notation to specify each element. For example,
{1,2}indicates the element in row 1, column 2.Specify the class, size, and complexity for each cell array element.
Optionally, add elements. See Add an Element to a Heterogeneous Cell Array
Optionally, specify properties for the structure that represents the cell array in the generated code. See Set Structure Properties for a Heterogeneous Cell Array.
Set Structure Properties for a Heterogeneous Cell Array
A heterogeneous cell array is represented as a structure in the generated code. You can specify the properties for the structure that represents the cell array.
Click to the right of the cell array definition. Optionally click
 .
.In the dialog box, specify properties for the structure in the generated code.
Property Description C type definition name Name for the structure type in the generated code.
Type definition is externally defined Default:
No— type definition is not externally defined.If you select
Yesto declare an externally defined structure, the app does not generate the definition of the structure type. You must provide it in a custom include file.Dependency:
C type definition nameenables this option.C type definition header file Name of the header file that contains the external definition of the structure, for example,
"mystruct.h". Specify the path to the file using the Additional include directories parameter on the project settings dialog box Custom Code tab.By default, the generated code contains
#includestatements for custom header files after the standard header files. If a standard header file refers to the custom structure type, then the compilation fails. If you specify the C type definition header file, the app includes that header file exactly at the point where it is required.Dependency:
When Type
                                                definition is externally defined
is set toYes, this option is enabled.Data alignment boundary The run-time memory alignment of structures of this type in bytes.
If you have an Embedded Coder license and use Code Replacement Libraries (CRLs), the CRLs provide the ability to align data objects passed into a replacement function to a specified boundary. You can take advantage of target-specific function implementations that require aligned data. By default, the structure is not aligned on any specific boundary so it is not matched by CRL functions that require alignment.
Alignment must be either
-1or a power of2that is no more than128.Default:
0Dependency:
When Type definition is externally
                                                defined
is set toYes, this option is enabled.
Change Classification as Homogeneous or Heterogeneous
To change the classification as homogeneous or heterogeneous, right-click the variable. Select Homogeneous or Heterogeneous.

The app clears the definitions of the elements.
Change the Size of the Cell Array
In the definition of the cell array, click a dimension. Specify the size.
For a homogeneous cell array, specify whether the dimension is variable size and whether the dimension is bounded or unbounded. Alternatively, right-click the variable. Select Bounded (fixed-size), Bounded (variable-size), or Unbounded
For a heterogeneous cell array, the app adds elements so that the cell array has the specified size and shape.
Add an Element to a Heterogeneous Cell Array
In the definition of the cell array, click a dimension. Specify the size. For example, enter 1 for the first dimension and 4 for the second dimension.
The app adds elements so that the cell array has the specified size and shape. For example for a 1x4 heterogeneous cell array, the app lists four elements:
{1,1},{1,2},{1,3}, and{1,4}.Specify the properties of the new elements.
Specify a Constant Input Parameter
On the Define Input Types page, click Let me enter input or global types directly.
Click the field to the right of the input parameter name.
Select Define Constant.
In the field to the right of the parameter name, enter the value of the constant or a MATLAB expression that represents the constant.
The app uses the value of the specified MATLAB expression as a compile-time constant.
See Also
Related Topics
Select a Web Site
Choose a web site to get translated content where available and see local events and offers. Based on your location, we recommend that you select: United States.
You can also select a web site from the following list
Americas
- América Latina (Español)
- Canada (English)
- United States (English)
Europe
- Belgium (English)
- Denmark (English)
- Deutschland (Deutsch)
- España (Español)
- Finland (English)
- France (Français)
- Ireland (English)
- Italia (Italiano)
- Luxembourg (English)
- Netherlands (English)
- Norway (English)
- Österreich (Deutsch)
- Portugal (English)
- Sweden (English)
- Switzerland
- United Kingdom (English)
Asia Pacific
- Australia (English)
- India (English)
- New Zealand (English)
- 中国
- 日本Japanese (日本語)
- 한국Korean (한국어)