Using Digital Filter Design Block
Overview of the Digital Filter Design Block
You can use the Digital Filter Design block to design and implement a digital filter. The filter you design can filter single-channel or multichannel signals. The Digital Filter Design block is ideal for simulating the numerical behavior of your filter on a floating-point system, such as a personal computer or DSP chip. You can use the Simulink® Coder™ product to generate C code from your filter block.
Filter Design and Analysis
You perform all filter design and analysis within the filter designer app, which opens when you double-click the Digital Filter Design block. Filter designer provides extensive filter design parameters and analysis tools such as pole-zero and impulse response plots.
Filter Implementation
Once you have designed your filter using filter designer, the block automatically realizes the filter using the filter structure you specify. You can then use the block to filter signals in your model. You can also fine-tune the filter by changing the filter specification parameters during a simulation. The outputs of the Digital Filter Design block numerically match the outputs of the equivalent filter System object™, when you pass the same input.
Saving, Exporting, and Importing Filters
The Digital Filter Design block allows you to save the filters you design, export filters (to the MATLAB® workspace, MAT-files, etc.), and import filters designed elsewhere.
To learn how to save your filter designs, see Saving and Opening Filter Design Sessions. To learn how to import and export your filter designs, see Import and Export Quantized Filters.
Note
You can use the Digital Filter Design block to design and implement a filter. To implement a pre-designed filter, use the Discrete FIR Filter or Biquad Filter blocks. Both methods implement a filter design in the same manner and have the same behavior during simulation and code generation.
See the Digital Filter Design block reference page for more information.
Create a Lowpass Filter in Simulink
You can use the Digital Filter Design block to design and implement a digital FIR or IIR filter. In this topic, you use it to create an FIR lowpass filter:
Open Simulink and create a new model file.
From the DSP System Toolbox™ Filtering library, and then from the Filter Designs library, click-and-drag a Digital Filter Design block into your model.
Double-click the Digital Filter Design block.
The filter designer app opens.
Set the parameters as follows, and then click OK:
Response Type =
LowpassDesign Method =
FIR,EquirippleFilter Order =
Minimum
                order
Units =
Normalized (0 to
                1)
wpass =
0.2wstop =
0.5
Click Design Filter at the bottom of the app to design the filter.
Your Digital Filter Design block now represents a filter with the parameters you specified.
From the Edit menu, select Convert Structure.
The Convert Structure dialog box opens.
Select Direct-Form FIR Transposed and click OK.
Rename your block
Digital Filter Design -
              Lowpass
.
The Digital Filter Design block now represents a lowpass filter with a Direct-Form FIR Transposed structure. The filter passes all frequencies up to 20% of the Nyquist frequency (half the sampling frequency), and stops frequencies greater than or equal to 50% of the Nyquist frequency as defined by the wpass and wstop parameters. In the next topic, Create a Highpass Filter in Simulink, you use a Digital Filter Design block to create a highpass filter. For more information about implementing a pre-designed filter, see Digital Filter Implementations.
Create a Highpass Filter in Simulink
In this topic, you create a highpass filter using the Digital Filter Design block.
If the model you created in Create a Lowpass Filter in Simulink is not open on your desktop, open the equivalent model ex_filter_ex4.
From the DSP System Toolbox Filtering library, and then from the Filter Designs library, click-and-drag a second Digital Filter Design block into your model.
Double-click the Digital Filter Design block. The filter designer app opens.
Set the parameters as follows:
Response Type =
HighpassDesign Method =
FIR,EquirippleFilter Order =
Minimum orderUnits =
Normalized (0 to 1)wstop = 0.2
wpass = 0.5
Click the Design Filter button at the bottom of the app to design the filter. Your Digital Filter Design block now represents a filter with the parameters you specified.
In the Edit menu, select Convert Structure. The Convert Structure dialog box opens.
Select Direct-Form FIR Transposed and click OK. Rename your block Digital Filter Design - Highpass.
The block now implements a highpass filter with a direct form FIR transpose structure. The filter passes all frequencies greater than or equal to 50% of the Nyquist frequency (half the sampling frequency), and stops frequencies less than or equal to 20% of the Nyquist frequency as defined by the wpass and wstop parameters. This highpass filter is the opposite of the lowpass filter described in Create a Lowpass Filter in Simulink. The highpass filter passes the frequencies stopped by the lowpass filter, and stops the frequencies passed by the lowpass filter. In the next topic, Filter High-Frequency Noise in Simulink, you use these Digital Filter Design blocks to create a model capable of removing high frequency noise from a signal. For more information about implementing a pre-designed filter, see Digital Filter Implementations.
Filter High-Frequency Noise in Simulink
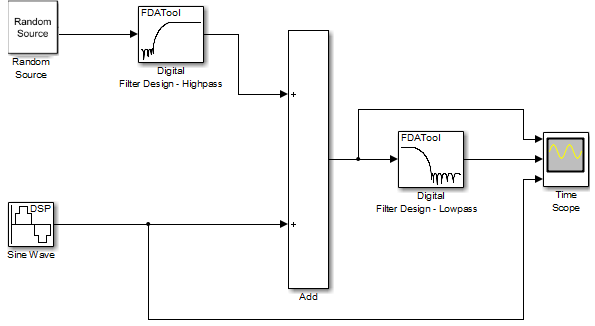
In the previous topics, you used Digital Filter Design blocks to create FIR lowpass and highpass filters. In this topic, you use these blocks to build a model that removes high frequency noise from a signal. In this model, you use the highpass filter, which is excited using a uniform random signal, to create high-frequency noise. After you add this noise to a sine wave, you use the lowpass filter to filter out the high-frequency noise.
If the model you created in Create a Highpass Filter in Simulink is not open on your desktop, open the equivalent model ex_filter_ex5.
Click-and-drag the following blocks into your model.
Sum (Simulink) block from the Simulink Math Operations library
Random Source block from the Sources library
Sine Wave block from the Sources library
Time Scope block from the Sinks library
Set the parameters for these blocks as indicated in the following table. Leave the parameters not listed in the table at their default settings.
Add block:
Icon shape =
rectangularList of signs =
++
Random Source block:
Source type = =
UniformMinimum = 0
Maximum = 4
Sample time = 1/1000
Samples per frame = 50
Sine Wave block:
Frequency (Hz) = 75
Sample time = 1/1000
Samples per frame = 50
Time Scope block:
Click Scope > Settings
Under Time, set Time span to
One frame period
Connect the blocks as shown in the following figure. You might need to resize some of the blocks to accomplish this task.

In the Modeling tab, click Model Settings. The Configuration Parameters dialog box opens.
In the Solver pane, set the parameters as follows, and then click OK:
Start time = 0
Stop time = 5
Type =
Fixed-stepSolver =
Discrete (no continuous states)
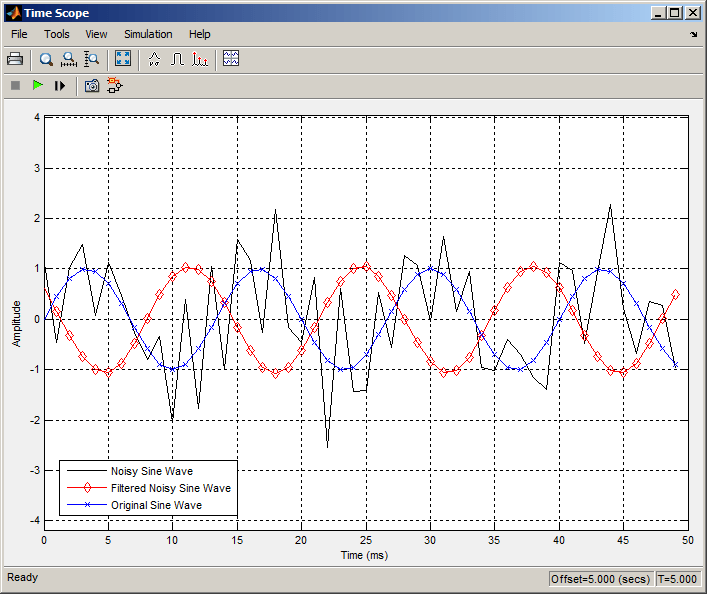
In the Simulation tab, select Run. The model simulation begins and the scope displays the three input signals.
To view the legend, in the Scope tab of the Time Scope toolstrip, click the Settings dropdown arrow, and select Legend. The legend appears in the Time Scope window. You can click-and-drag it anywhere on the scope display. To change the channel names, double-click inside the legend and replace the current numbered channel names with the following:
Add =
Noisy Sine WaveDigital Filter Design - Lowpass =
Filtered Noisy Sine WaveSine Wave =
Original Sine Wave
In the next step, you will set the color, style, and marker of each channel.
In the Scope tab of the Time Scope window, click Settings, and set the following under Line Style:
Set Line to Noisy Sine Wave
Style: -
Marker: none
Color: Yellow
Set Line to Filtered Noisy Sine Wave
Line: -
Marker: diamond
Color: Red
Set Line to Original Sine Wave
Line: NONE
Marker: x
Color: Blue
The Time Scope display should now appear as follows. You can see that the lowpass filter filters out the high-frequency noise in the noisy sine wave.

To view an equivalent model with these settings, open ex_filter_ex5_equivalent.slx.
You have now used Digital Filter Design blocks to build a model that removes high frequency noise from a signal. For more information about these blocks, see the Digital Filter Design block reference page. To learn how to save your filter designs, see Saving and Opening Filter Design Sessions. To learn how to import and export your filter designs, see Import and Export Quantized Filters.