Create and Run a Simple Programmatic App
This example shows how to create and run a programmatic app using MATLAB® functions. The example guides you through the process of building a runnable app in which users can interactively explore different types of plots. Build the app using these steps:
Design the app layout by creating the main figure window, laying out the UI components in it, and configuring the appearance of the components by setting properties.
Program the app to respond when a user interacts with it.
Run the app to verify that your app looks and behaves as expected.
Define Main App Function
To create a programmatic app, write your app code in a function file. This allows users to run your app from the Command Window by entering the name of the function.
Create a new function named simpleApp and save it to a file named simpleApp.m in a folder that is on the MATLAB path. Provide context and instructions for using the app by adding help text to your function. Users can see this help text by entering help simpleApp in the Command Window.
function simpleApp
% SIMPLEAPP Interactively explore plotting functions
%   Choose the function used to plot the sample data to see the
%   differences between surface plots, mesh plots, and waterfall plots

end
Write all of your app code inside the simpleApp.m file. To view the full example code, see Run the App.
Create UI Figure Window
Every programmatic app requires a UI figure window to serve as the primary app container. This is the window that appears when a user runs your app, and it holds the UI components that make up the app. Create a UI figure window configured specifically for app building by calling the uifigure function. Return the resulting Figure object as a variable so that you can access the object later in your code. You can modify the size, appearance, and behavior of your figure window by setting figure properties using dot notation.
In this example, add this code to the simpleApp function to create a UI figure window and specify its title.
fig = uifigure;
fig.Name = "My App";
Manage App Layout
Manage the position and size of UI components in your figure window using a grid layout manager. This allows you to lay out your UI components in a grid by specifying a row and column for each component.
Add a grid layout manager to your app by using the uigridlayout function. Create the grid in the figure window by passing in fig as the first argument, and then specify the grid size. In this example, create a 2-by-2 grid by adding this code to the simpleApp function.
gl = uigridlayout(fig,[2 2]);
Control the size of each grid row and column by setting the RowHeight and ColumnWidth properties of the grid layout manager. In this example, ensure that the focal point of your app is the plotted data. Specify that the top row of the app is 30 pixels tall, and that the second row fills the rest of the figure window. Fit the width of the first column to the content it holds.
gl.RowHeight = {30,'1x'};
gl.ColumnWidth = {'fit','1x'};
For more information about how to lay out apps, see Lay Out Apps Programmatically.
Create and Position UI Components
Users interact with your app by interacting with different UI components, such as buttons, drop-downs, or edit fields. For a list of all available UI components, see App Building Components.
This example uses three different UI components:
A label to provide instruction
A drop-down to let users choose a plotting function
A set of axes to plot the data on
Create a UI component and add it to the grid by calling the corresponding component creation function and specifying the grid layout manager as the first input argument. Store the components as variables to access them later in your code. To create and store these three components, add this code to the simpleApp function.
lbl  = uilabel(gl);
dd = uidropdown(gl);
ax = uiaxes(gl);
After you create the components for your app, position them in the correct rows and columns of the grid. To do this, set the Layout property of each component. Position the label in the upper-left corner of the grid and the drop-down in the upper-right corner. Make the Axes object span both columns in the second row by specifying Layout.Column as a two-element vector.
% Position label
lbl.Layout.Row = 1;
lbl.Layout.Column = 1;
% Position drop-down
dd.Layout.Row = 1;
dd.Layout.Column = 2;
% Position axes
ax.Layout.Row = 2;
ax.Layout.Column = [1 2];
Configure UI Component Appearance
Every UI component object has many properties that determine its appearance. To change a property, set it using dot notation. For a list of component properties, see the corresponding properties page. For example, DropDown lists all the properties of the drop-down component.
Modify the label text to provide context for the drop-down options by setting the Text property.
lbl.Text = "Choose Plot Type:";
Specify the plotting functions that users can choose from in the drop-down by setting the Items property. Set the value of the drop-down that the user sees when they first run the app.
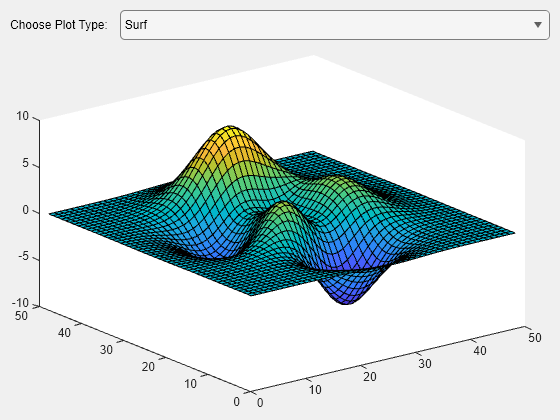
dd.Items = ["Surf","Mesh","Waterfall"];
dd.Value = "Surf";
Program App Behavior
Program your app to respond to user interactions by using callback functions. A callback function is a function that executes when the app user performs a specific interaction, such as selecting a drop-down item. Every UI component has multiple callback properties, each of which corresponds to a different user interaction. Write a callback function and assign it to an appropriate callback property to control the behavior of your app.
In this example, program your app to update the plot when a user selects a new drop-down item. In the simpleApp.m file, after the simpleApp function, define a callback function named changePlotType. MATLAB automatically passes two input arguments to every callback function when the callback is triggered. These input arguments are often named src and event. The first argument contains the component that triggered the callback, and the second argument contains information about the user interaction. Define changePlotType to accept src and event in addition to a third input argument that specifies the axes to plot on. In the callback function, access the new drop-down value using the event argument and then use this value to determine how to update the plot data. Call the appropriate plotting function and specify the input axes as the axes to plot on.
function changePlotType(src,event,ax)
type = event.Value;
switch type
    case "Surf"
        surf(ax,peaks);
    case "Mesh"
        mesh(ax,peaks);
    case "Waterfall"
        waterfall(ax,peaks);
end
end
To associate the changePlotType function with the drop-down component, in the simpleApp function, set the ValueChangedFcn property of the drop-down component to be a cell array. The first element of the cell array is a handle to the changePlotType callback function. The second element is the Axes object to plot the data on. When an app user selects a drop-down option, MATLAB calls the callback function and passes in the source, event, and axes arguments. The callback function then updates the plot in the app.
dd.ValueChangedFcn = {@changePlotType,ax};
For more information about writing callback functions, see Create Callbacks for Apps Created Programmatically.
Finally, to make sure the plotted data is consistent with the drop-down value even before changePlotType first executes, call the surf function.
surf(ax,peaks);
Run the App
After adding all of the app elements, your simpleApp function should look like this:
function simpleApp
% SIMPLEAPP Interactively explore plotting functions
%   Choose the function used to plot the sample data to see the
%   differences between surface plots, mesh plots, and waterfall plots

% Create figure window
fig = uifigure;
fig.Name = "My App";

% Manage app layout
gl = uigridlayout(fig,[2 2]);
gl.RowHeight = {30,'1x'};
gl.ColumnWidth = {'fit','1x'};

% Create UI components
lbl = uilabel(gl);
dd = uidropdown(gl);
ax = uiaxes(gl);

% Lay out UI components
% Position label
lbl.Layout.Row = 1;
lbl.Layout.Column = 1;
% Position drop-down
dd.Layout.Row = 1;
dd.Layout.Column = 2;
% Position axes
ax.Layout.Row = 2;
ax.Layout.Column = [1 2];

% Configure UI component appearance
lbl.Text = "Choose Plot Type:";
dd.Items = ["Surf" "Mesh" "Waterfall"];
dd.Value = "Surf";
surf(ax,peaks);

% Assign callback function to drop-down
dd.ValueChangedFcn = {@changePlotType,ax};
end

% Program app behavior
function changePlotType(src,event,ax)
type = event.Value;
switch type
    case "Surf"
        surf(ax,peaks);
    case "Mesh"
        mesh(ax,peaks);
    case "Waterfall"
        waterfall(ax,peaks);
end
end
View the help text for your app.
help simpleApp simpleApp Interactively explore plotting functions
Choose the function used to plot the sample data to see the
differences between surface plots, mesh plots, and waterfall plots
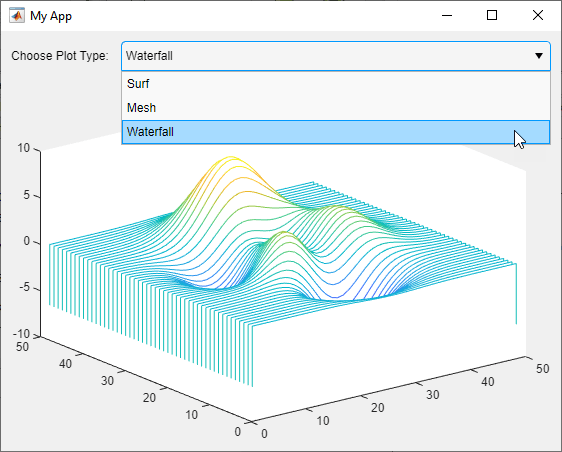
Run the app by entering the app name in the Command Window. Update the plot by choosing a different plotting option from the drop-down.
simpleApp