Create and Edit Variables
Create Variables
The MATLAB® workspace consists of the variables you create and store in memory during a MATLAB session. You can create new variables in the workspace by running MATLAB code or using existing variables.
To create a new variable, enter the variable name in the Command Window, followed by an equal
sign (=
) and the value you want to assign to the variable. For
example, if you run these statements, MATLAB adds the four variables x
, A
,
I
, and C
to the workspace:
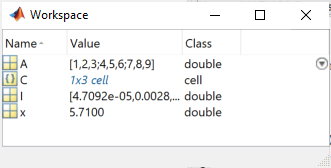
x = 5.71; A = [1 2 3; 4 5 6; 7 8 9]; I = besseli(x,A); C = {A A A};
You do not have to declare variables before assigning values to them.
If you do not end the assignment statement with a semicolon
(;
), MATLAB displays the result in the Command
Window. For example,
x = 5.71
x = 5.7100
If you do not explicitly assign the output of a statement to
a variable, MATLAB generally assigns the result to the reserved
word ans
. The value of ans
changes
with every statement that returns an output value that is not assigned
to a variable. For example,
sin(1)
ans = 0.8415
To view and edit variables, use the Workspace browser and Variables editor. (Some editing options are not available in MATLAB Online™.)
View Workspace Contents
To view a list of variables in your workspace, use the Workspace browser.
To open the Workspace browser if it is not currently visible, do either of the following:
On the Home tab, in the Environment section, click Layout. Then, under Show, select Workspace.
Type
workspace
in the Command Window.
By default, the Workspace browser displays the base workspace. You also can view function workspaces if MATLAB is in debug mode. For more information, see Base and Function Workspaces.
To display additional columns such as size and range, on the Workspace browser title bar, click the Show Workspace Actions button , and then click Choose Columns. In MATLAB Online, to select which columns to display, right-click a column name in the Workspace panel and select or clear the desired column names.
You also can use the who
command in the Command Window
to view a list of variables. To list information about size and class, use the
whos
command. For example, if you
have the variables x
, A
, and
I
in your workspace, you can run the who
and whos
commands to view your
workspace
contents:
who
Your variables are: A C I x
whos
Name Size Bytes Class Attributes A 3x3 72 double C 1x3 528 cell I 3x3 72 double x 1x1 8 double
View Variable Contents
You can view the contents of a variable in several ways:
Command Window — Type the variable name at the command prompt. For example:
x
x = 5.7100
Variables editor — In the Workspace browser, double-click a variable name. The Variables editor opens for that variable.
Some variables open a viewer or other tool appropriate for their type. For details, see the documentation for that data or object type.
A Protected Property or Private Property icon next to a variable property in the Variables editor indicates that the property is protected or private, respectively.
To change how the Variables editor displays variables, go to the View tab, and in the Format section, select a number display format. The display format does not affect how values are displayed in the Command Window or Workspace browser, or how the variables are saved.
Note
The maximum number of elements in a variable that you can open in the Variables editor depends on your operating system and the amount of physical memory installed on your system.
Edit Variable Contents
You can edit the contents of scalar (1-by-1) variables in the Workspace browser. To edit the contents, click the variable value to select it and then enter a new value.
To edit other variables, open them in the Variables editor.
For example, suppose that you create a cell array, C
,
by running these commands in the Command Window:
A = magic(4); C = {A A A};
C
to open it in the Variables
editor.
To edit an element of a variable, double-click the element.
The element opens in a new document within the Variables editor. For
example, if you double-click element C{1,1}
in
the Variables editor, the contents of that cell open in a new tab.
You can edit the value of a variable element by clicking the element
and typing a new value. Press Enter or click another
element to save the change.
To return to the parent cell array or structure of an element, go to the View tab and click the Go Up button.
Changes you make in the Variables editor are automatically saved in the workspace. Changes you make to variables via the Command Window or other operations automatically update the information for those variables in the Workspace browser and Variables editor.
Note
You cannot edit elements or subsets of multidimensional arrays in the Variables editor.
You cannot edit tall arrays in the Variables editor.
When editing strings in the Workspace browser or as part of a structure in the Variables editor, you must use double quotes to surround the string value.
Edit Table and Structure Array Variables
Tables (including timetables) and structure arrays support additional editing actions.
Action | Procedure |
---|---|
Modify column or row name | Double-click the name and enter the new text.
|
Reorder variables | Hover over the left side of a variable until a four-headed arrow appears. Then, click and drag the column to a new location.
|
Modify units and description of variables | Click the arrow that appears to the right of a variable name. Then, enter new text in the Units and Description fields.
|
Sort variable data | Click the arrow that appears to the right of a variable name and select Ascending or Descending.
|
Note
The contents of a table are only visible and modifiable when the number of variables is fewer than 5000. When the number of variables equals or exceeds 5000, you can only view the table properties.
Changes made to certain variable types in the Variables editor also appear in the Command
Window. For example, suppose you have a table T
that contains
three columns, A
, B
, and
C
. If you delete column A
in the
Variables editor, the line T(:,'A') = [];
displays in the
Command Window. To suppress code display in the Command Window, on the
View tab, clear the Show MATLAB
Code check box.
Resize or Reshape Variables
To modify the size, shape, and order of variable elements in the Variable editor, use one of these procedures.
Action | Procedure |
---|---|
Delete row, column, or variable elements | Right-click the desired row header, column header, or selected elements and select Delete Row or Delete Column. |
Insert new row or column | Right-click the desired row header, column header, or element
and select Insert Row Above,
Insert Row Below, Insert
Column to the Left, or Insert Column
to the Right. You can also add rows or columns
simply by entering a value in an empty row or column. For example,
to add a row and column to the array in C{1,1} ,
enter a value in element (5,5). |
Cut variable elements | Right-click the desired row header, column header, or selected elements and select Cut. The cut values move to the clipboard and are replaced by the default value for empty elements. For more information, see Empty Elements. |
Copy variable elements | Right-click the desired row header, column header, or selected elements and select Copy. |
Paste variable elements | Right-click the row header, column header, or element where you want the insertion to begin and select Paste. |
Paste cells from Microsoft® Excel® spreadsheet | Right-click the element where you want the insertion to begin, and then select Paste Excel Data. |
Empty Elements
Empty elements in variables are assigned default values. Default assignments are:
0
for numeric arrays[]
for cell arrays and structure arrays<undefined>
for categorical variables
Copy, Rename, and Delete Variables
You can copy and paste, duplicate, rename, and delete variables within the Workspace browser.
Action | Procedure |
---|---|
Copy variable to and from clipboard | Select the variables, right-click, and then select Copy. Then, you can paste the names, for example, into the Command Window or an external application. Multiple variables are comma-separated. |
Duplicate variable | Select the variables, right-click, and then select Duplicate. MATLAB creates a copy of the selected variables. |
Rename a workspace variable | Right-click the variable name, and then select Rename. Type the new variable name and press Enter. |
Delete all variables in workspace | On the Home tab, in the Variable section, click Clear Workspace. You also
can use the |
Delete selected variables from workspace | Select the variables in the Workspace browser, right-click, and then select Delete. You can also use the To preserve
specified variables, but delete others, use the |
To create a new workspace variable from an existing variable, in the Variables editor, select an element, data range, row, or column in an array, and then in the Variable tab, select New from Selection.
You can change the character that delimits decimals in the data when you cut and
paste values from the Variables editor into text files or other applications. You
might do this, for instance, if you provide data to a locale that uses a character
other than the period (.
). To change the delimiter character,
specify a Decimal separator for exporting numeric data via system
clipboard in the Variables Preferences.
Navigate Variable Contents
When editing variables in the Variables editor, some variables can contain large amounts of data, making it difficult to navigate between elements. Use these keyboard shortcuts to move easily between variable elements in the Variables editor. You cannot modify these keyboard shortcuts.
Action | Keyboard Shortcut |
---|---|
Commit changes to element and move to next element. Variables Preferences enable you to specify what the next element is. The default is to move down. | Enter |
Move right. Within a selection, Tab also moves from the last column in one row to the first column in the next row. | Tab |
Move in opposite direction of Enter or Tab. | Shift+Enter or Shift+Tab |
Move up | Page Up |
Move down | Page Down |
Move to column 1. | Home |
Move to row 1, column 1. | Ctrl+Home |
Edit current element, positioning cursor at the end of the element. | F2 (Ctrl+U on Apple Macintosh platforms) |