plot
Plot driving scenario
Description
plot( creates a 3-D plot with
orthonormal perspective, as seen from immediately above the driving scenario,
scenario)scenario.
plot(
specifies options using one or more name-value pairs. For example, you can use these
options to display road centers and actor waypoints on the plot.scenario,Name,Value)
Examples
Create a driving scenario containing a figure-8 road specified in the world coordinates of the scenario. Convert the world coordinates of the scenario to the coordinate system of the ego vehicle.
Create an empty driving scenario.
scenario = drivingScenario;
Add a figure-8 road to the scenario. Display the scenario.
roadCenters = [0  0  1
             20 -20  1
             20  20  1
            -20 -20  1
            -20  20  1
              0   0  1];

roadWidth = 3;
bankAngle = [0 15 15 -15 -15 0];
road(scenario,roadCenters,roadWidth,bankAngle);
plot(scenario)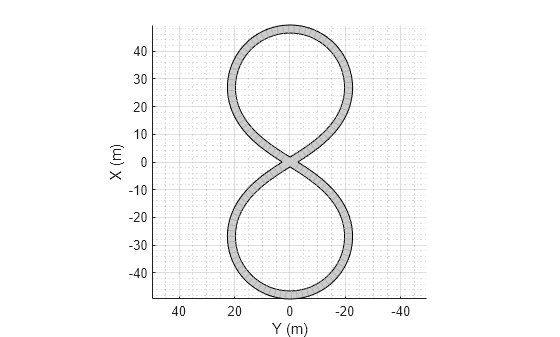
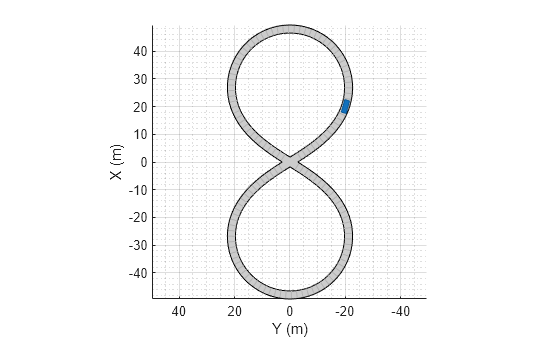
Add an ego vehicle to the scenario. Position the vehicle at world coordinates (20, –20) and orient it at a –15 degree yaw angle.
ego = actor(scenario,'ClassID',1,'Position',[20 -20 0],'Yaw',-15);
Warning: Class ID 1 is not supported for an actor. The drivingScenario object created a vehicle instead. ClassID of actor must be one of these values: 3 (Bicycle), 4 (Pedestrian), 5 (Jersey Barrier), or 6 (Guardrail).
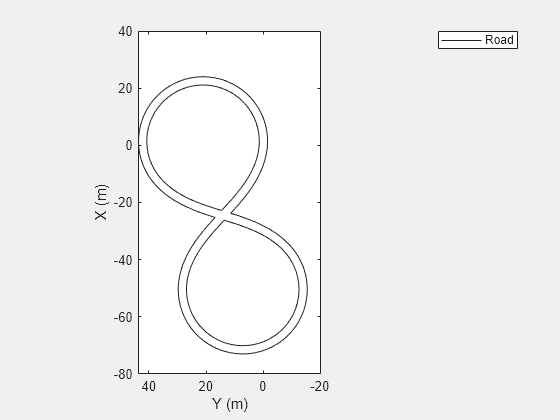
Obtain the road boundaries in ego vehicle coordinates by using the roadBoundaries function. Specify the ego vehicle as the input argument.
rbEgo1 = roadBoundaries(ego);
Display the result on a bird's-eye plot.
bep = birdsEyePlot;
lbp = laneBoundaryPlotter(bep,'DisplayName','Road');
plotLaneBoundary(lbp,rbEgo1)
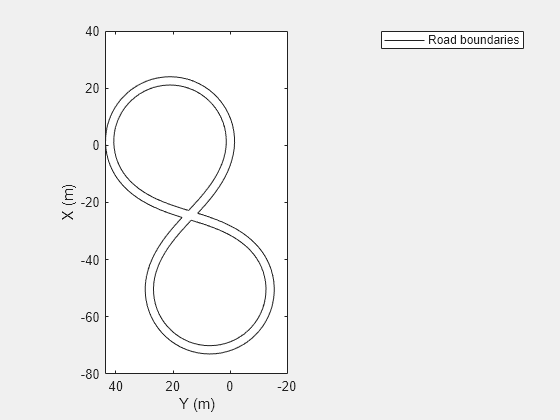
Obtain the road boundaries in world coordinates by using the roadBoundaries function. Specify the scenario as the input argument.
rbScenario = roadBoundaries(scenario);
Obtain the road boundaries in ego vehicle coordinates by using the driving.scenario.roadBoundariesToEgo function.
rbEgo2 = driving.scenario.roadBoundariesToEgo(rbScenario,ego);
Display the road boundaries on a bird's-eye plot.
bep = birdsEyePlot;
lbp = laneBoundaryPlotter(bep,'DisplayName','Road boundaries');
plotLaneBoundary(lbp,{rbEgo2})
Create a driving scenario containing a curved road, two straight roads, and two actors: a car and a bicycle. Both actors move along the road for 60 seconds.
Create the driving scenario object.
scenario = drivingScenario('SampleTime',0.1','StopTime',60);
Create the curved road using road center points following the arc of a circle with an 800-meter radius. The arc starts at 0°, ends at 90°, and is sampled at 5° increments.
angs = [0:5:90]';
R = 800;
roadcenters = R*[cosd(angs) sind(angs) zeros(size(angs))];
roadwidth = 10;
cr = road(scenario,roadcenters,roadwidth);
Add two straight roads with the default width, using road center points at each end. To the first straight road add barriers on both road edges.
roadcenters = [700 0 0; 100 0 0];
sr1 = road(scenario,roadcenters);
barrier(scenario,sr1)
barrier(scenario,sr1,'RoadEdge','left')
roadcenters = [400 400 0; 0 0 0];
road(scenario,roadcenters);
Get the road boundaries.
rbdry = roadBoundaries(scenario);
Add a car and a bicycle to the scenario. Position the car at the beginning of the first straight road.
car = vehicle(scenario,'ClassID',1,'Position',[700 0 0], ...
    'Length',3,'Width',2,'Height',1.6);
Position the bicycle farther down the road.
bicycle = actor(scenario,'ClassID',3,'Position',[706 376 0]', ...
    'Length',2,'Width',0.45,'Height',1.5);
Plot the scenario.
plot(scenario,'Centerline','on','RoadCenters','on');
title('Scenario');

Display the actor poses and profiles.
allActorPoses = actorPoses(scenario)
allActorPoses=242×1 struct array with fields:
    ActorID
    Position
    Velocity
    Roll
    Pitch
    Yaw
    AngularVelocity
allActorProfiles = actorProfiles(scenario)
allActorProfiles=242×1 struct array with fields:
    ActorID
    ClassID
    Length
    Width
    Height
    OriginOffset
    MeshVertices
    MeshFaces
    RCSPattern
    RCSAzimuthAngles
    RCSElevationAngles
Because there are barriers in this scenario, and each barrier segment is considered an actor, actorPoses and actorProfiles functions return the poses of all stationary and non-stationary actors. To only obtain the poses and profiles of non-stationary actors such as vehicles and bicycles, first obtain their corresponding actor IDs using the scenario.Actors.ActorID property.
movableActorIDs = [scenario.Actors.ActorID];
Then, use those IDs to filter only non-stationary actor poses and profiles.
movableActorPoseIndices = ismember([allActorPoses.ActorID],movableActorIDs);

movableActorPoses = allActorPoses(movableActorPoseIndices)
movableActorPoses=2×1 struct array with fields:
    ActorID
    Position
    Velocity
    Roll
    Pitch
    Yaw
    AngularVelocity
movableActorProfiles = allActorProfiles(movableActorPoseIndices)
movableActorProfiles=2×1 struct array with fields:
    ActorID
    ClassID
    Length
    Width
    Height
    OriginOffset
    MeshVertices
    MeshFaces
    RCSPattern
    RCSAzimuthAngles
    RCSElevationAngles
Since R2024b
Create a driving scenario object.
scenario1 = drivingScenario(StopTime=1.25);
Add road and lane segments to the driving scenario.
laneSpecification = lanespec(2,Width=5);
roadCenters = [27 24 0;
              27 -3 0;
              47 16 0];
road(scenario1,roadCenters,Lanes=laneSpecification);
Specify the vehicle parameters, along with its waypoints and relative speed values.
egoCar1 = vehicle(scenario1,ClassID=1,Position=[22 19 0], ...
    PlotColor=[0.494 0.184 0.556],Name="Car1",Length=10,FrontOverhang=1.8);
waypoints = [22 19 0;
            19 13 0;
            19 6 0;
            20 2 0;
            33 -6 0;
            48 10 0];
speed = 25;
Create a trajectory for the vehicle, with reference to the front-axle for steering.
trajectory(egoCar1,waypoints,speed,ReferenceSteerPosition="front-axle")Create an another driving scenario object.
scenario2 = drivingScenario(StopTime=1.25);
Add the same road and lane segments to the driving scenario which you added to the previous driving scenario.
road(scenario2,roadCenters,Lanes=laneSpecification);
Specify the same vehicle parameters, along with its waypoints and relative speed values which you added to the previous driving scenario.
egoCar2 = vehicle(scenario2,ClassID=1,Position=[22 19 0], ...
    PlotColor=[0.466 0.674 0.188],Name="Car2",Length=10,FrontOverhang=1.8);
Create a trajectory for the vehicle, with reference to the default rear-axle for steering.
trajectory(egoCar2,waypoints,speed)
Plot and simulate the scenarios, displaying the front-axle and rear-axle trajectories. Observe the first subplot contains a dashed line trajectory for the rear axle, created with reference to the front-axle steering.
fig = figure(Visible="on"); % Ensure the figure is visible
axesWidth  = 0.35;          % Relative width of each axes
axesHeight = 0.8;           % Relative height of each axes
margin     = 0.1;           % Margin from left/right and between axes

% Calculate axes positions of each subplot for equal spacing
pos1 = [margin 0.1 axesWidth axesHeight];
pos2 = [1-(margin+axesWidth) 0.1 axesWidth axesHeight];

% Specify title to the first axes in the figure
ax1 = axes(fig,Position=pos1);
title(ax1,"Trajectory with Front-Axle Steering")

% Specify title to the second axes in the figure
ax2 = axes(fig,Position=pos2);
title(ax2,"Trajectory with Rear-Axle Steering")

% Plot and simulate the scenarios
plot(scenario1,Waypoints="on",RoadCenters="on",ShowRearAxle="on",Parent=ax1)
plot(scenario2,Waypoints="on",RoadCenters="on",ShowRearAxle="on",Parent=ax2)
while advance(scenario1) && advance(scenario2)
    pause(0.1)
end

Input Arguments
Name-Value Arguments
Tips
To rotate any plot, in the figure window, select View > Camera Toolbar.