Generate and Deploy Optimized Code for Digit Classification Deep Learning Network on Infineon PPU Target
This example shows how to generate and deploy optimized code for a digit classification deep learning network to run on an Infineon® AURIX™ TC4x PPU.
This example uses the Classify (Deep Learning Toolbox) block from Deep Learning Toolbox™ to classify data using a pretrained digit classification network. In addition, the example shows a detailed workflow to deploy the digit classification network to the nSIM instruction Simulator.
Pretrained Digit Classification Network Details
This example provides a digitClassificationNet.mat file that contains a pretrained digit classification network. This network is trained on the digit data set included with Deep Learning Toolbox. For details, see Data Sets for Deep Learning (Deep Learning Toolbox). The network expects a grayscale image of a handwritten digit as input and outputs the probability of each possible digit class (0-9).
Use this data set to train the digit classification network.
dataFolder = fullfile(toolboxdir('nnet'),'nndemos','nndatasets','DigitDataset');
imds = imageDatastore(dataFolder, ...
    'IncludeSubfolders',true,'LabelSource','foldernames');
classNames = categories(imds.Labels);
% Display classification labels.
disp(classNames);
    {'0'}
    {'1'}
    {'2'}
    {'3'}
    {'4'}
    {'5'}
    {'6'}
    {'7'}
    {'8'}
    {'9'}
Load pretrained digit classification network to examine the network architecture. The network comprises an imageInputLayer (Deep Learning Toolbox), fullyConnectedLayer (Deep Learning Toolbox), reluLayer (Deep Learning Toolbox), and a softmaxLayer (Deep Learning Toolbox).
load('digitClassificationNet.mat');
disp(net.Layers)
5×1 Layer array with layers:
1 'imageinput' Image Input 28×28×1 images with 'zerocenter' normalization
2 'fc_1' Fully Connected 128 fully connected layer
3 'relu' ReLU ReLU
4 'fc_2' Fully Connected 10 fully connected layer
5 'softmax' Softmax softmax
Read Image for Classification from Data Set
The data set consists of 10,000 images in total, with 1000 images for each digit class (0-9) arranged sequentially. The data set is split into 70% for training (7,000 images), 20% for validation (2,000 images), and 10% for testing (1,000 images). To classify any image from the data set, choose an image by selecting a random number between 1 and 10,000.
randomImageNumber =5046; im = single(imread(imds.Files{randomImageNumber})); imshow(im, 'InitialMagnification', 'fit');

Import Image Data as Input
To prepare image data for import into the Simulink® model, create a structure variable 'InputImage' in the workspace. This variable contains the input image data and an empty time vector. In the DigitClassification model provided with this example, the From Workspace block labeled InputImage Data From Workspace uses the structure variable 'InputImage' for data access.
InputImage.time = [];
InputImage.signals.values = im;
InputImage.signals.dimensions = size(im);
Create Simulink model
Create a Simulink model using the Classify block. The Classify block predicts class labels for the input image using the trained network imported from a MAT file or MATLAB® function. In this example, the Classify Block receives input from the InputImage Data From Workspace block that loads the input image data from the 'InputImage' workspace variable.
Use the open_system command to open the DigitClassification model and view the model blocks.
modelName = 'DigitClassification';
open_system(modelName);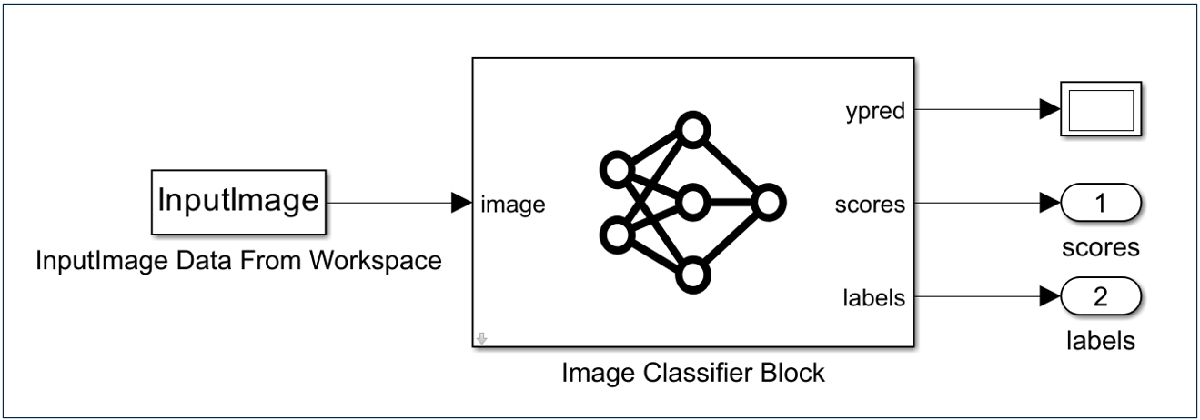
Follow these steps to configure the Classify block.
Double-click the Classify block to open its properties.
Update File path by locating the
digitClassificationNet.matfile using Browse.Specify Class names workspace variable as
classNames. This variable was created in the Pretrained Digit Classification Network Details section.Select the check boxes for Classification and Predictions to enable output for the class label and the corresponding probabilities.

Configure Simulink model
Configure the model for code generation on the Infineon AURIX TC4x PPU - nSIM Simulator target. You can configure a model using the interactive or programmatic approach.
Interactive Approach
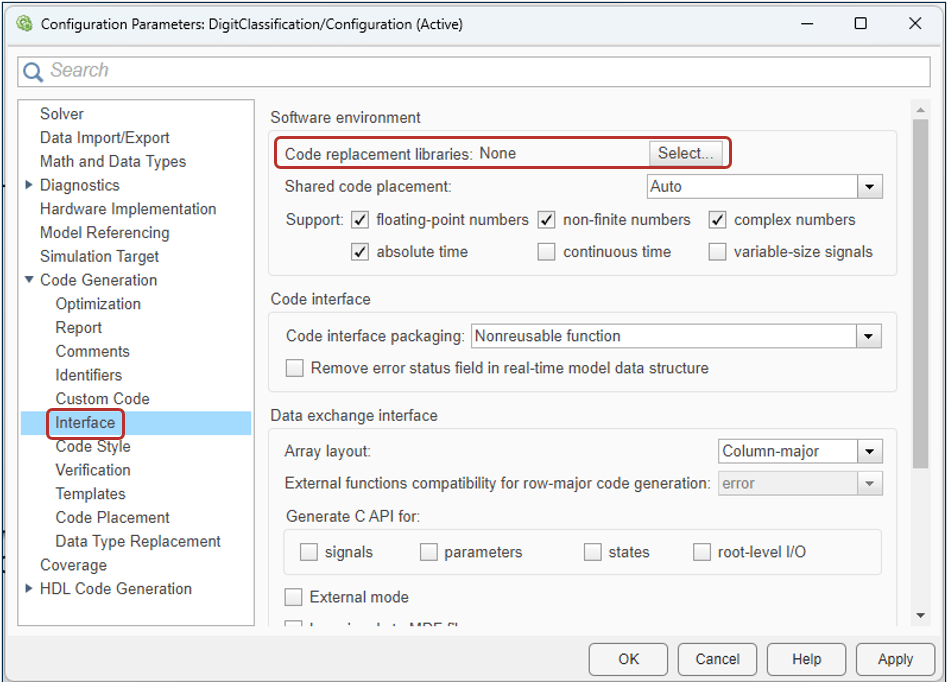
1. Press CTRL + E or click Model settings in the Modeling tab to open the Configuration Parameters dialog box.

2. In the Hardware Implementation pane, set Hardware board to Infineon AURIX TC4x PPU - nSIM Simulator.

3. To optimize code generation for the Infineon AURIX TC4x PPU, expand the Code Generation pane, and under the Interface section, set Code replacement libraries to MetaWare TC4x PPU for Deep Learning.
The MetaWare TC4x PPU for Deep Learning Code Replacement Library (CRL) prioritizes efficient memory usage alongside performance enhancements. By selecting this library, you specifically optimize the matrix multiplication operation used in the deep learning network layers. If your primary focus is maximizing performance, explore the other supported CRLs for the Infineon TC4x PPU.

Programmatic Approach
This command configures the DigitClassification.slx model for deployment on the Infineon AURIX TC4x PPU - nSIM Simulator.
set_param(modelName, 'HardwareBoard', 'Infineon AURIX TC4x PPU - nSIM Simulator');
This command sets the code replacement library to use MetaWare TC4x PPU for Deep Learning.
set_param(modelName, 'CodeReplacementLibrary', 'MetaWare TC4x PPU for Deep Learning');
Verify on nSIM Simulator Using SIL/PIL Manager
Use the SIL/PIL manager to perform numerical accuracy verification of the generated code against the simulation output. You can run a model in PIL mode using the interactive or programmatic approach.
Interactive Approach
1. In the Simulink model, open the SIL/PIL Manager app to enable the SIL/PIL tab. In the SIL/PIL tab, set SIL/PIL Mode to Processor-in-loop (PIL) and click Run Verification.


2. Clicking Run Verification opens the Simulation Data Inspector. Use the Simulation Data Inspector to verify the numerical accuracy of the data.
3. Set the absolute or relative tolerance under [+] More section in the Simulink Data Inspector window.
4. In the Simulink Data Inspector plot, observe that the simulation output is overlapping with the PIL output (subplot-1), and the absolute tolerance is less than 1e-5 (subplot-2).
Programmatic Approach
Execute these commands to run the model programmatically in PIL mode.
set_param(modelName, 'SimulationMode', 'processor-in-the-loop');
out = sim(modelName);
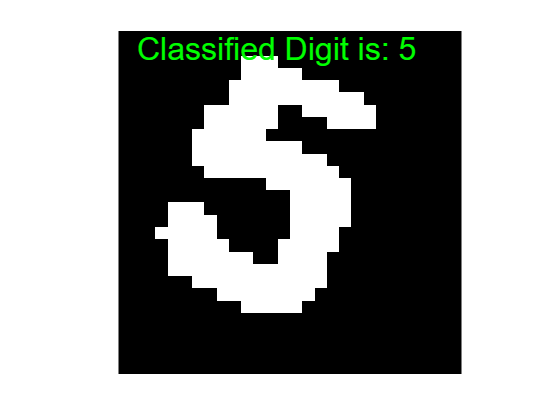
Display Predicted Classification Label
After running the SIL/PIL manager, view the classified label using the output variables scores and labels stored in the MATLAB workspace.
% Extract the scores from the codegen output.
scores = out.yout{1}.Values.Data(:,:,1);

% Extract the labels from the codegen output.
labels = out.yout{2}.Values.Data(:,:,1);
labelsCellArray = cellfun(@extractIntegerFromStringHelper, cellstr(labels), 'UniformOutput', false);

% Convert the scores to a categorical label.
classifiedLabel = cellstr(scores2label(scores, labelsCellArray));

% Create the figure and display the image
figure;
imshow(im, 'InitialMagnification', 'fit');
hold on;  % Allow adding text on top of the image

% Set text properties (font size, position, color)
textProps.FontSize = 24;
textProps.Position = [2 2];  % Adjust position as needed
textProps.Color = 'green';

% Create text object and display the classified label
text(textProps.Position(1), textProps.Position(2), ...
     sprintf('Classified Digit is: %s', classifiedLabel{1}), textProps);

hold off;  % Prevent further modifications on top of the image
See Also
Blocks
- Image Classifier (Deep Learning Toolbox) | Predict (Deep Learning Toolbox) | Stateful Classify (Deep Learning Toolbox) | Stateful Predict (Deep Learning Toolbox)
Functions
open_system|load_system|set_param|sim